

To help our design tool plugin users keep their workflows organized, we compiled a list of 8 best practices!

Applanga supports plugins for Adobe XD, Figma, and Sketch. All three plugins boast the same features to help users get the most out of each plugin. The plugins allow users to upload all translatable content from their design files to an Applanga project where the content can then be easily translated. Once translations are available in an Applanga project, users can also use the plugins to generate translated versions of the design files.
If you’re new to our design tool plugins, we understand kicking off Applanga projects with design tool integrations can feel overwhelming at the beginning. To help get you started, we compiled a list of 8 plugin best practices. These are not hard rules, but instead helpful guidelines for keeping your projects organized.
We generally recommend users create a copy of design files to download translations - this can ensure nothing gets lost in translation. However, we understand this can be impractical in a fast-paced, continuous work environment. If you follow the best practices outlined below, you can use the plugins with your main design file project and avoid creating any headaches with your files, projects, or translations. We do recommend users create a copy of design files or even just a given page to download translations - this ensures nothing is lost in translation; even though you can always download your original content back into you design file.
 Before using design content for translations, users should test the plugin features first. Practice uploading and downloading content, experiment with the options, and review your changes on the Applanga dashboard. You can use the Integration Docs to walk through the steps or you can review our guide for specific design-stage use cases.
Either the design file or the Applanga project could be the Source of Truth for the source content. This should be determined before kicking off projects with one of the design tool plugins.
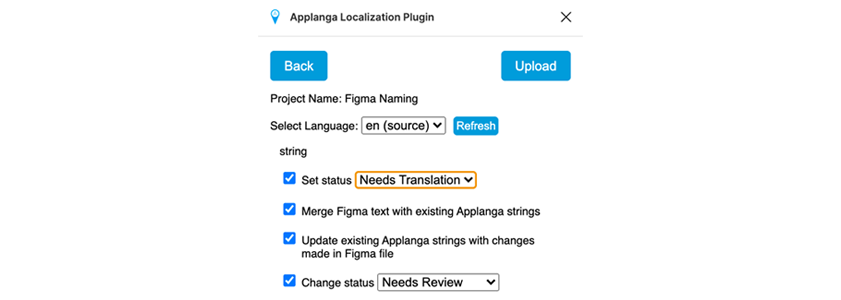 To keep track of recently uploaded content within an Applanga project, users should set a status for new content and/or updated content. This is a newer feature of the Applanga plugins. To set a status for uploaded content, click to expand the Upload options, mark the checkbox for Set Status, then use the dropdown to select the appropriate status. Now, if you want to overwrite existing source content in an Applanga project, you can easily make that visible to anybody working in the dashboard via the status. See the integration docs for more detailed information.
Ideally, one user should work on uploading/downloading design file content with the plugin at a time. Designate the specific team member before kicking off the project. Remember - with great power comes great responsibility! Designating one person to use the Applanga plugin for design projects prevents switching text around, uploading incorrect source text, overwriting accurate text, as well as other related problems.
Designs of apps are updated often - meaning designers move around elements, copy elements, delete elements, etc. The Applanga plugins were designed with this in mind. The important part is the initial upload. Once that is done, the plugin sets the Applanga string Id inside the file for a given text field. Now, if text should be moved around or text elements are copied and reused, the plugin keeps the connection for consecutive uploads and downloads. If a text field is deleted and recreated however, the connection is lost during the deletion. When in doubt, the Inspect/Edit Ids option shows users which string Id is connected with a specific text field.
While the default upload settings will crawl and upload your whole file, sometimes you may need to be more selective. On one hand, by adding 3 underscores to any element or page name (___Name), the plugin can be instructed to ignore certain components for upload. On the other, in the upload options, the scope can be set to only the currently selected page.
With this latest release, the newest feature of the design plugins allow users to select specific text elements down to a single element for upload to the Applanga project. This helps users be very precise for the scope of uploads.
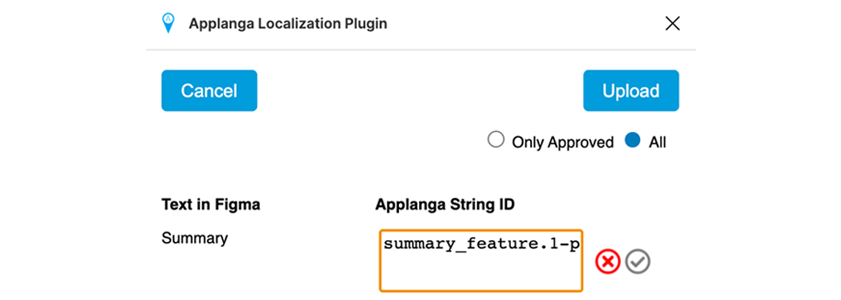 During the initial upload of design content to the Applanga dashboard, users have the option to set specific string Ids for every text element. If the string naming convention for the designed app is already established and string Ids are named accordingly during the upload process, design file content can be easily migrated to the app, including any translations.
Otherwise, the plugin defaults to naming the string IDs based on the formatting layers within the design file itself (e.g. “pagename.layername.elementname”).
The plugin also includes the option to Inspect/Edit Ids. With this feature, users can view the Applanga string Ids connected to specific text in the respective design file. Users can also create new strings Ids by removing the current Id and setting a new one via the plugin. Even if the string Ids were not named correctly upon the initial upload, with this feature, they can be adjusted at a later stage. Please note that creating a new string ID will not migrate any existing translations to that new Id., however users can link duplicates to ensure no translations are lost in the shuffle.
It’s recommended to create a copy for the download of translations, more specifically - either the whole file or just at a page-level works. While the source content can always be downloaded and the original status restored, creating translated copies ensures that any processes relying on the original file version are not interrupted.
We hope these best practices help keep you and your projects organized. We understand following all recommendations isn’t required or may not be possible, but keeping them in mind may still prove useful.
Interested in learning more about localization at the design stage? See our workflow documentation.
Want to learn how to use the plugins? Watch our Localization at the Design Stage Webinar on YouTube!!
If you still have questions, reach out to us at Support@Applanga.Com for more help!

Master key naming conventions and file structure to help ensure a seamless localization process
Read the Full Article
Are you wondering which keys stored in your Applanga projects are actually used in your app and which ones are just dead weight?
Read the Full Article