GlobalLink Strings for Adobe XD Plugin
A plugin for translating Adobe XD files with GlobalLink Strings.
Table of Contents
- Installation in Adobe XD
- Connecting a GL Strings Project and the Plugin
- Usage
- Connection Settings
- Uploading content for translation
- Translate your Adobe XD file
- How to upload only translated screenshots
- Inspect & Edit Keys
- Placeholders Replacement
- Check and Align file
Installation in Adobe XD
The plugin requires Adobe XD v21+ to run.
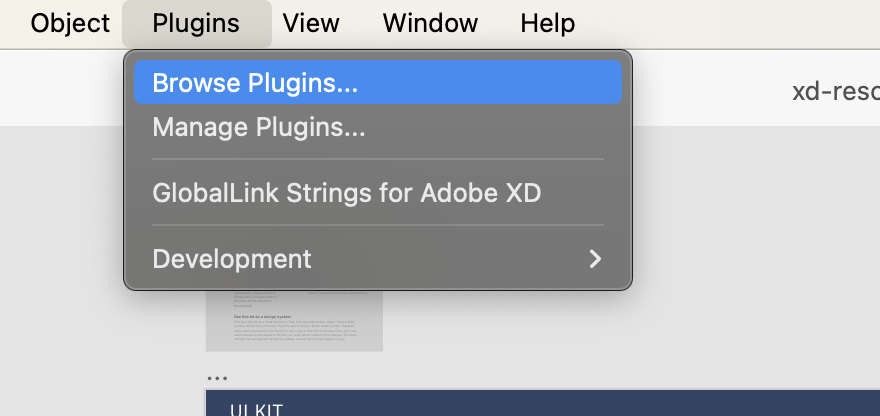
- Go to your Adobe XD file and open Menu > Plugins > Browse Plugins.
- Creative Cloud application will open. In the left panel type GlobalLink in the Search All Plugins field and press <enter>.
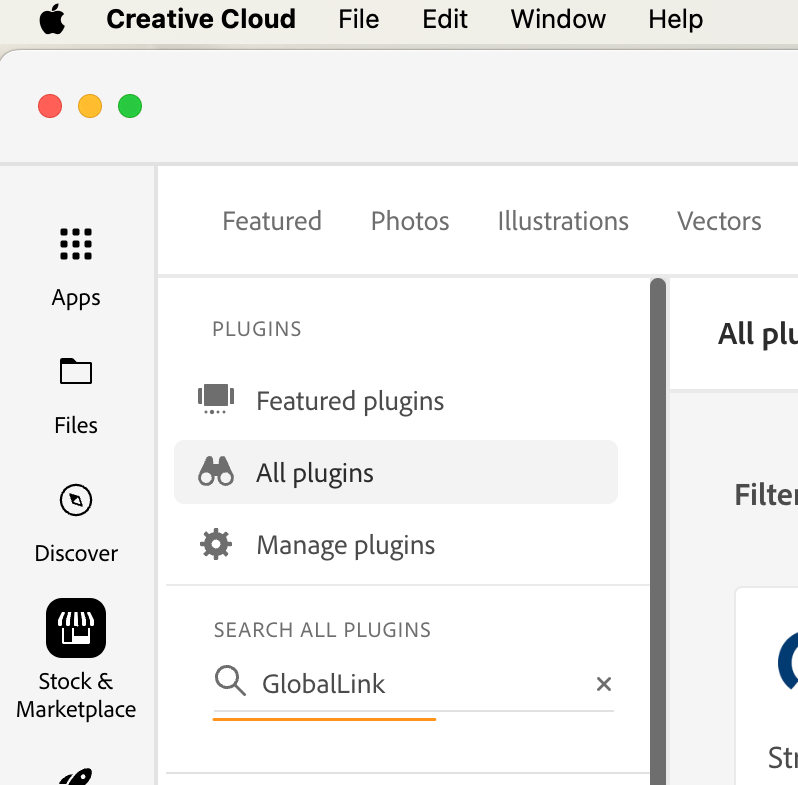
- Click Browse all plugins button.
- Click Install.
Back to Top
Connecting a GL Strings Project and the Plugin
For a new project
- Create a new project in the GL Strings Dashboard.
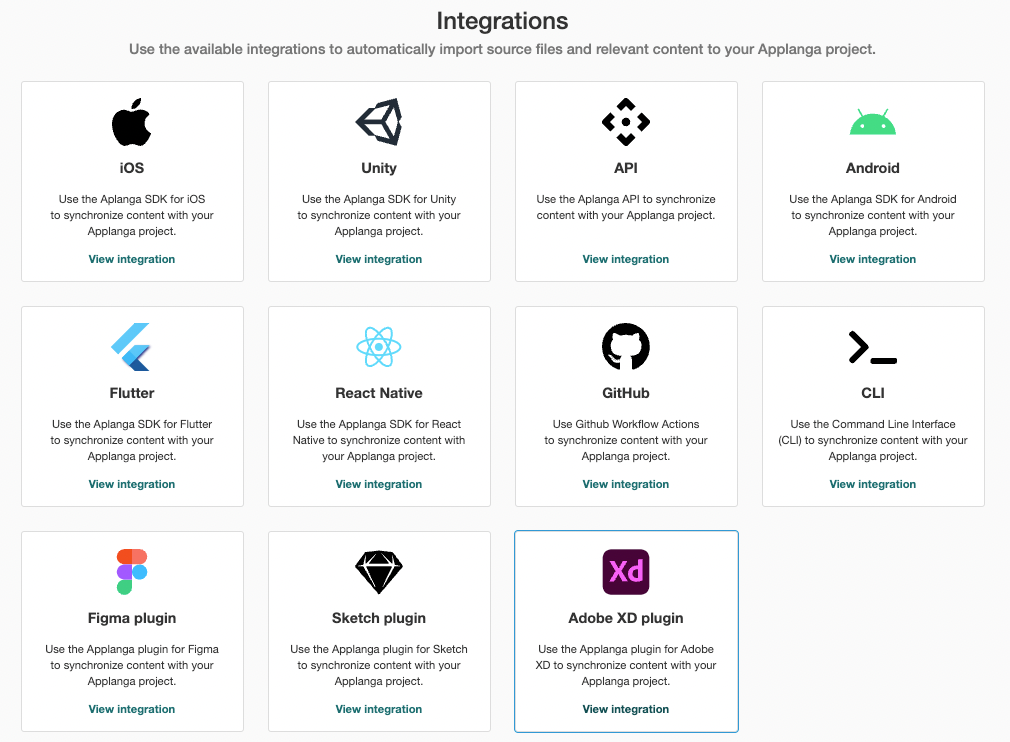
- Follow the prompts and select the Adobe XD integration option.
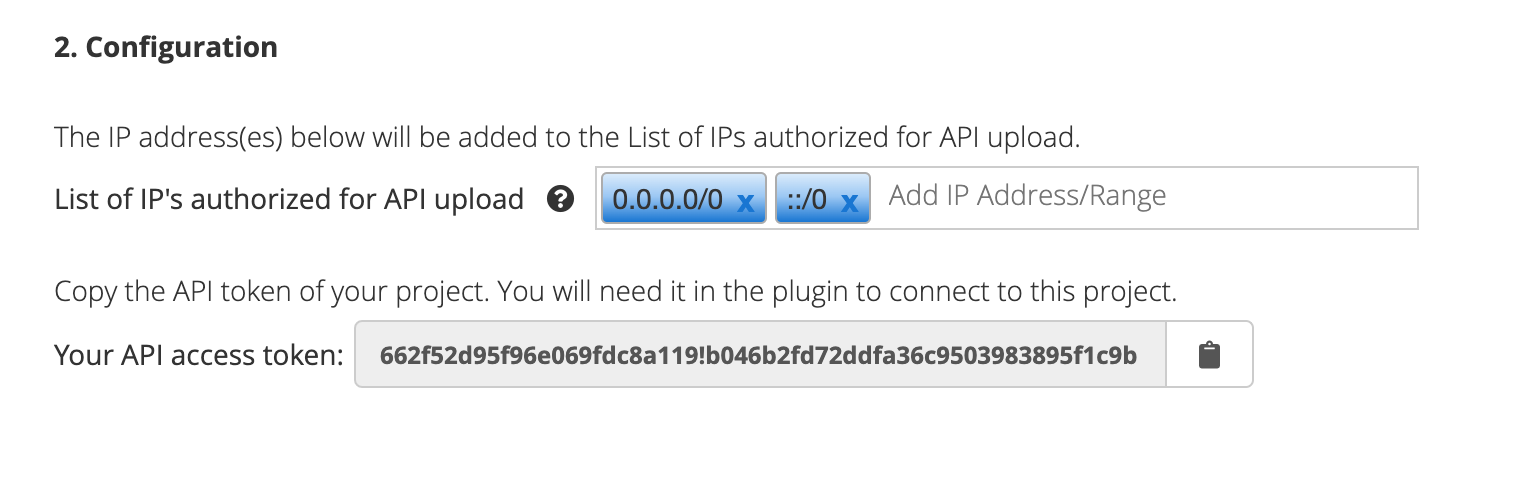
- Copy the API Token by clicking on the clipboard icon. You will need it to start using the plugin.
- Click on "Go to Project" to confirm the configuration (This will automatically whitelist all IPs so you are able to upload Adobe XD content to the project using the plugin! If needed, you can remove
::/0 and 0.0.0.0/0 then add your specific IP address. This will allow only you to upload content.)
For an already existing project
- Go to
Project Settings of the project.
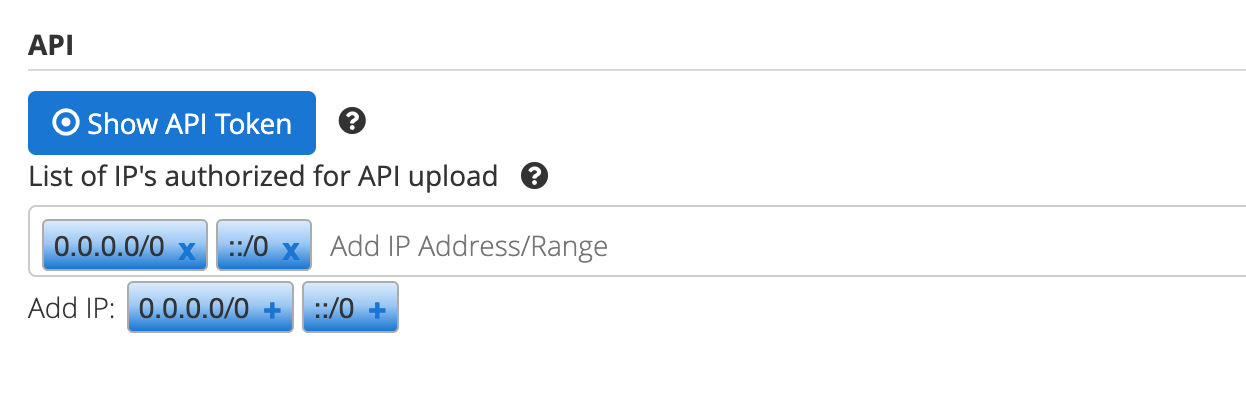
- Add
::/0 and 0.0.0.0/0 or the authorized IP addresses in the List of IP's authorized for API upload. This will authorize you to upload Adobe XD content to the project using the plugin!
- Copy the API Token by clicking on "Show API key" and then the clipboard icon. You will need it to start using the plugin.
- Scroll to the bottom of the Project Settings page and click "Update".
In the Plugin

- If the design file is not yet connected to a project, the plugin will open on the Connection Settings page
- Enter the Project API Token
- Confirm the Project Name is correct.
- If your Project has Branching enabled, use Select Branch to configure the Branch that should be used by the plugin for uploads and downloads.
- Click Connect to GL Strings project
Back to Top
Usage
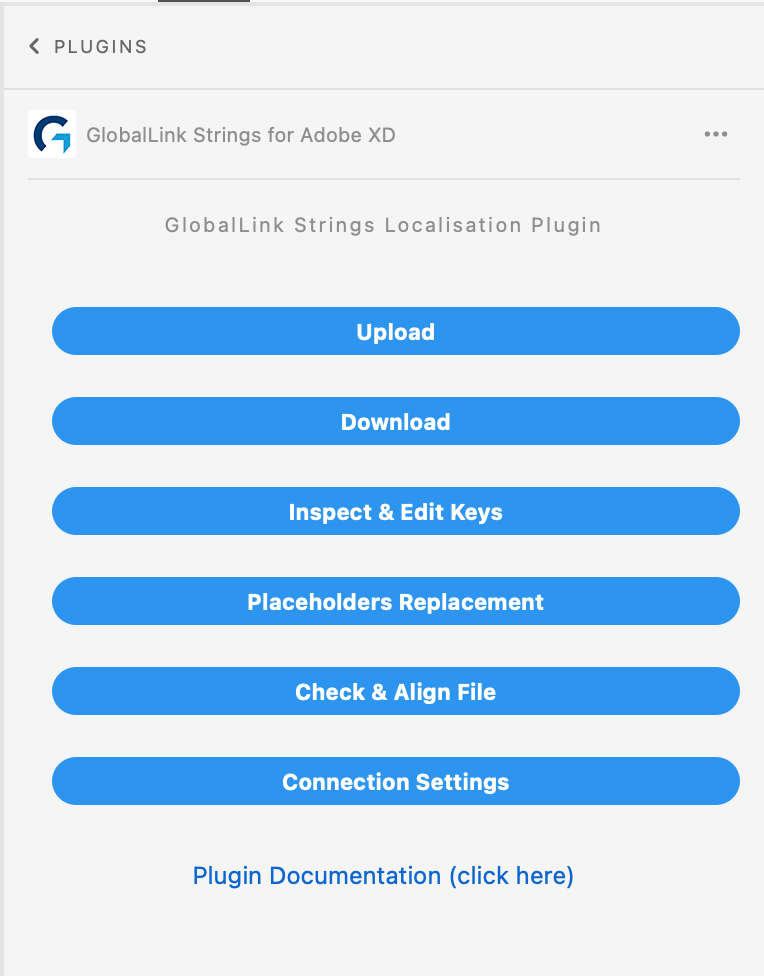
Connection Settings
- GL Strings Project API Token: copy the API Token from your project settings
- GL Strings Project Name: corresponds to the entered API token (not editable)
- Select Branch: If your Project has Branching enabled, use Select Branch to configure the Branch that should be used by the plugin.
- Connect to GL Strings project: saves the connection settings on your local machine. The selected options are saved separately for each Adobe XD file and will be loaded the next time you open the file on your machine and start the plugin.
Back to Top
Uploading content for translation
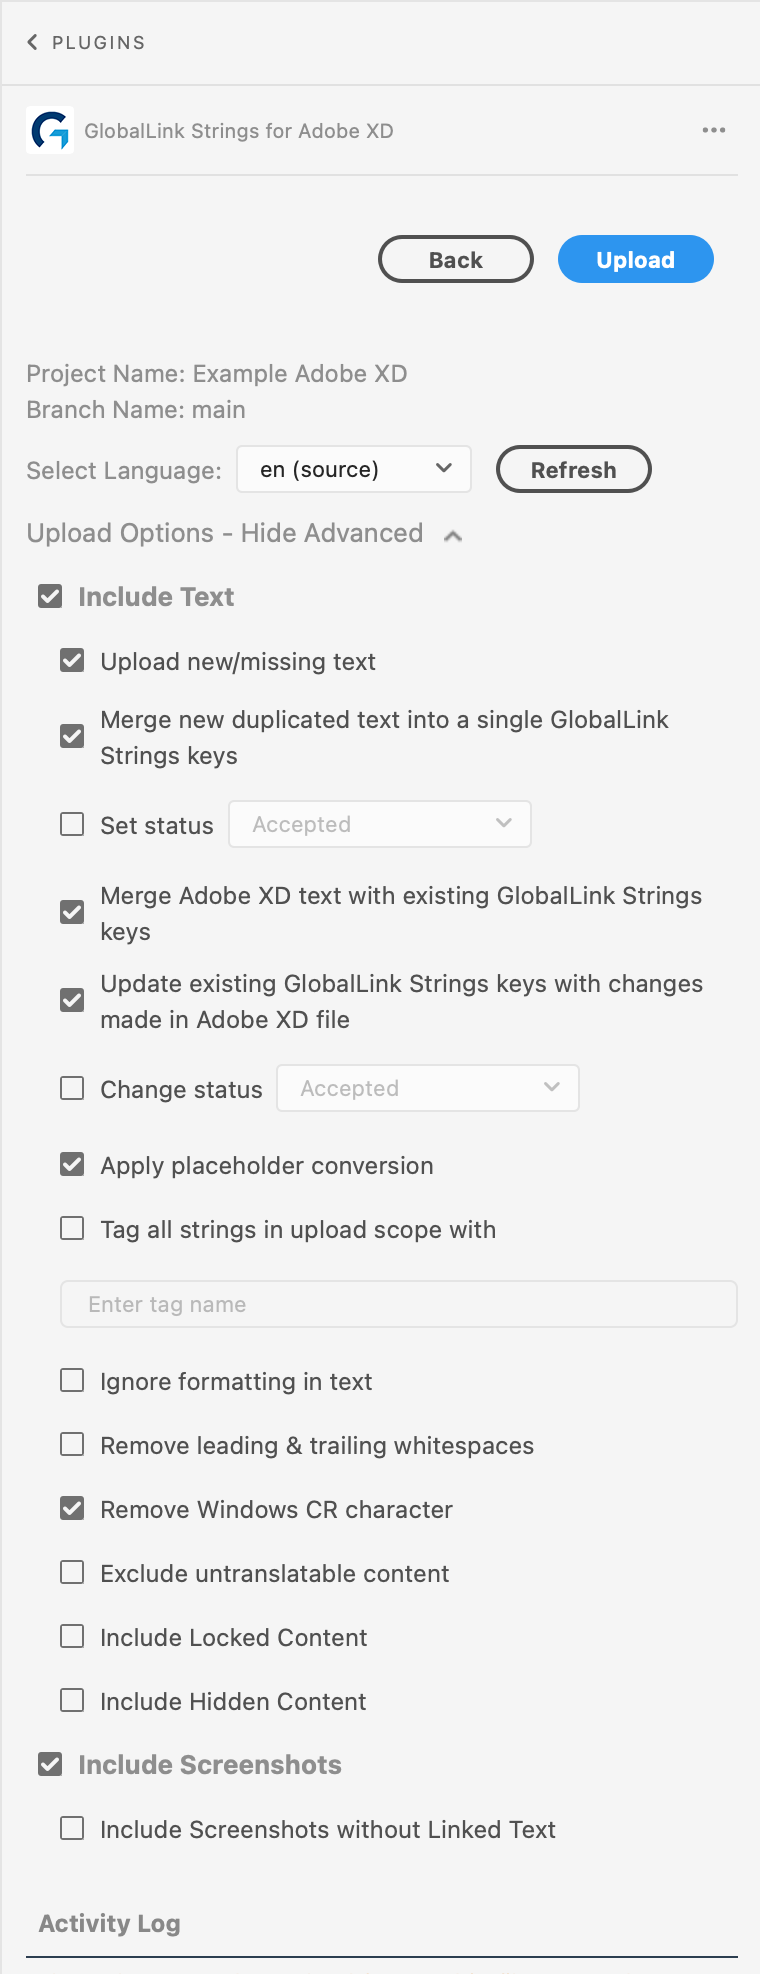
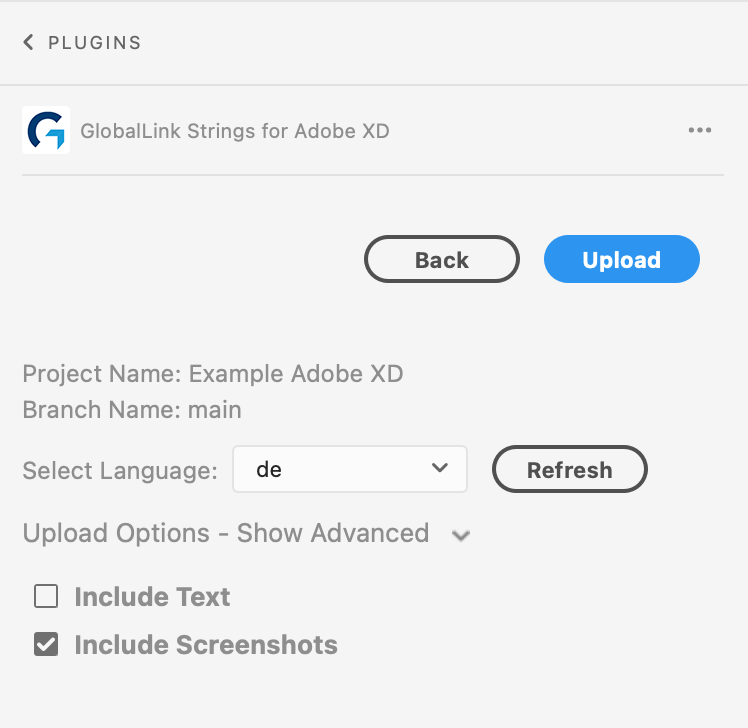
Upload options
The Upload button toggles between Upload and Upload Selected depending on if you select any elements in the Adobe XD file. The button is only active if there is an upload language selected, and either the Text or Screenshots option is enabled. Additionally, in the case of selection(s) made in the file, the selected content must include translatable text.
- Project Name: this is set to the project which the plugin is currently linked via the API token (not editable).
- Branch name: for projects with bprojectranching enabled, it shows the Branch that is configured for the plugin as upload target (not editable).
- Select language for Upload: the source language is preselected by default, but you can select any language for upload. This is particularly useful for uploading localized screenshots for testing.
- Text and Screenshots : select what you would like to upload to the project (by default both options are selected for source language, and only Screenshots options is selected for target language upload).
- Advanced Upload Options
- Upload new/missing text: with this option enabled, any text present in the file and not yet in your project is uploaded (by default enabled).
- Merge new duplicated text into a single GL Strings key: when this option is enabled during upload, for every text that is not in your project yet, all duplicates found in the file for that text are 'merged' into a single new key. If this option is disabled, one key is created for each of the duplicate texts element seperately (by default enabled).
- Set status: this option sets a status for all new content uploaded to a GL Strings project. To update the status of an already existing string on GL Strings, use the Change status option.
- Merge Adobe XD text with existing GlobalLin Strings keys: when this option is enabled during upload, if a string with the exact same text already exists, the existing string Id is applied to the Adobe XD file instead of generating a new one. If multiple such strings exist, one is chosen randomly (by default enabled).
- Update existing GlobalLink Strings keys with changes made in Adobe XD file: when this option is selected, the corresponding strings on GL Strings will be overwritten with the content from the Adobe XD file (by default enabled).
- Change status: this option changes the status of an already existing string on GL Strings.
- Apply Placeholder Conversion: if development placeholders exist in the connected project and they are mapped in the Plugin Placeholders Replacement options, this will convert placeholders on download to the Adobe XD file.
- Tag all strings in upload scope with: to link the strings in scope for the upload with a tag, enable this option and enter a tag name.
- Ignore formatting in text: if there is formatting applied to the Adobe XD text (like bolding, font size, font family, etc) the formatting will not be included in the upload to GL Strings.
- Remove leading & trailing whitespaces: this option will remove any leading or trailing spaces from any text elements in upload scope during upload.
- Exclude untranslatable content: this option will exclude specific types of untranslatable content from upload to the connected project. Options for exclusion from upload include only numbers, times and dates, special characters, Lorem ipsum placeholder text, symbols, or single characters.
- Include Locked Content: determines if the locked (padlock icon) content is included in translation scope (by default disabled).
- Include Hidden Content: determines if the hidden (close/open eye icon) content is included in translation scope. Please note, that there may invisible elements that will be included in scope, because they are invisible for other reasons than the “visible” property status (by default disabled).
- Include Screenshots without Linked Text: if selected, screenshots that couldn't be linked to any text are uploaded to the GL Strings project (by default disabled).
❗ Important Notes
- If you want to exclude any other elements from the upload (complete artboards or single elements), add 3 underscores in front of the element name (___).
- The upload for big files particularly including screenshot upload may take several minutes.
- You must whitelist your IPs in the Project Settings page before you can use the plugin! See the Configuration section for more details.
The activity log will display the progress messages and any errors.
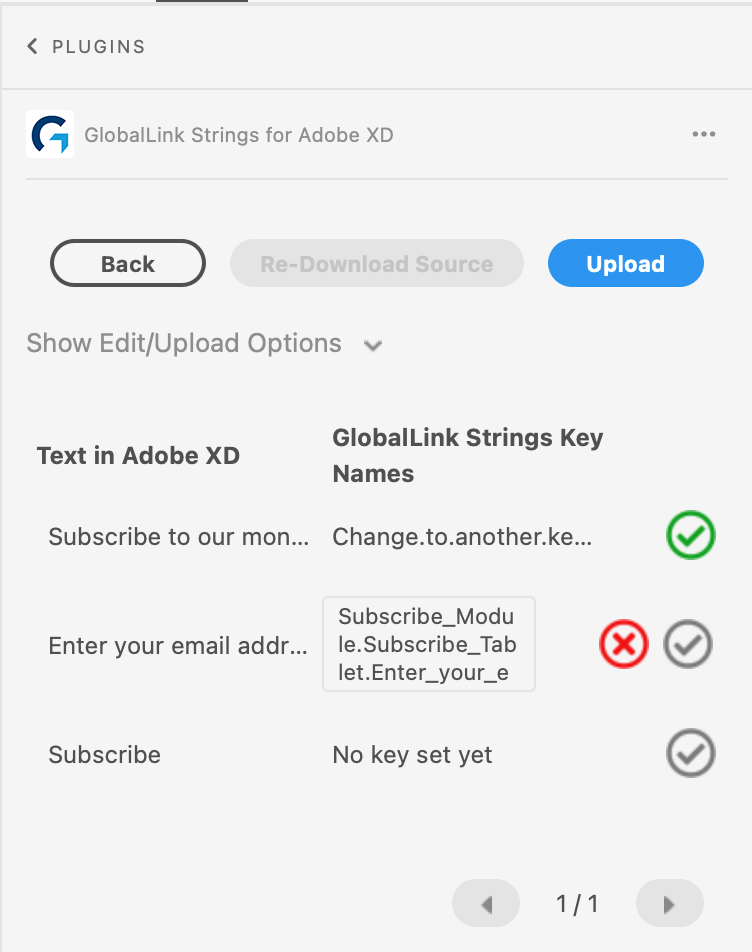
Renaming Keys
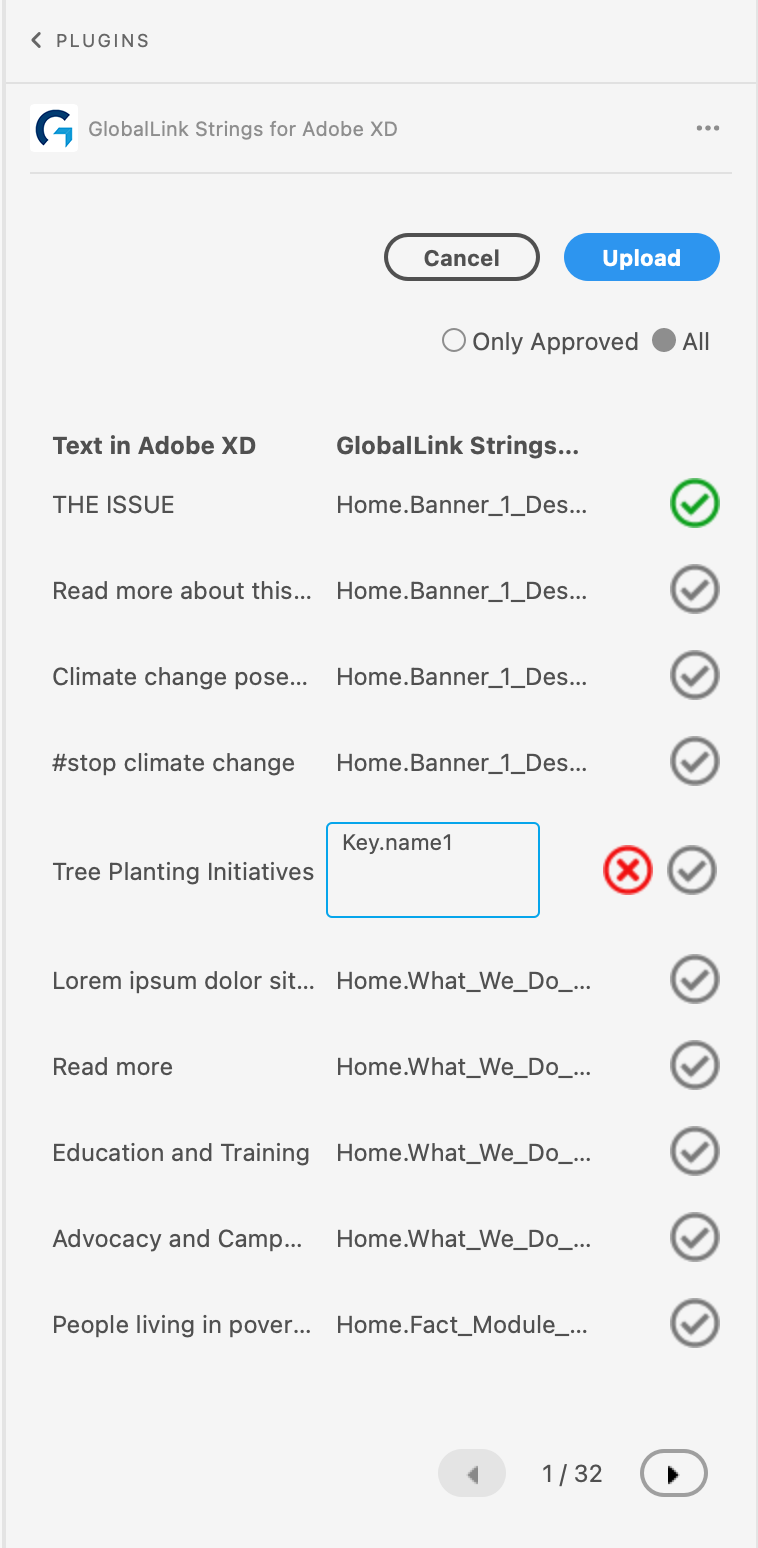
When new keys are being created by the plugin in your project as part of the upload, there is the option to manually edit any of those new keys. The dialog will not display if only screenshots are uploaded, there are no text elements to upload, or if the plugin could find an already existing key in your project and match it to the text in upload scope.
- Click the source text, to expand it to display the full source content
- Click the suggested key to edit it
- Click Confirm to approve the edits. You can also unconfirm to restore the original key name. If the Confirm button becomes red, the key is invalid. Most often its value conflicts (the same key, different text value) with an key that already exists in your project or with a newly created key. Hover over the button to see a more detailed error message.
- Only Approved or All (default) determines if all of the text elements are to be uploaded to GL Strings or only confirmed strings (green checkbox). If any edits are made to the keys, only those approved will be included in the upload.
The Upload button starts the upload immediately. The upload options are again visible. During the upload process, the activity log will inform you of the progress and any errors.
Back to Top
Translate your Adobe XD file
Once translations for your content are available in your project, you can use the plugin to download the translations and populate them in the Adobe XD file.
You may prevent any part of your file from being translated by locking or hiding the elements out of scope and/or by limiting the download to selected elements.
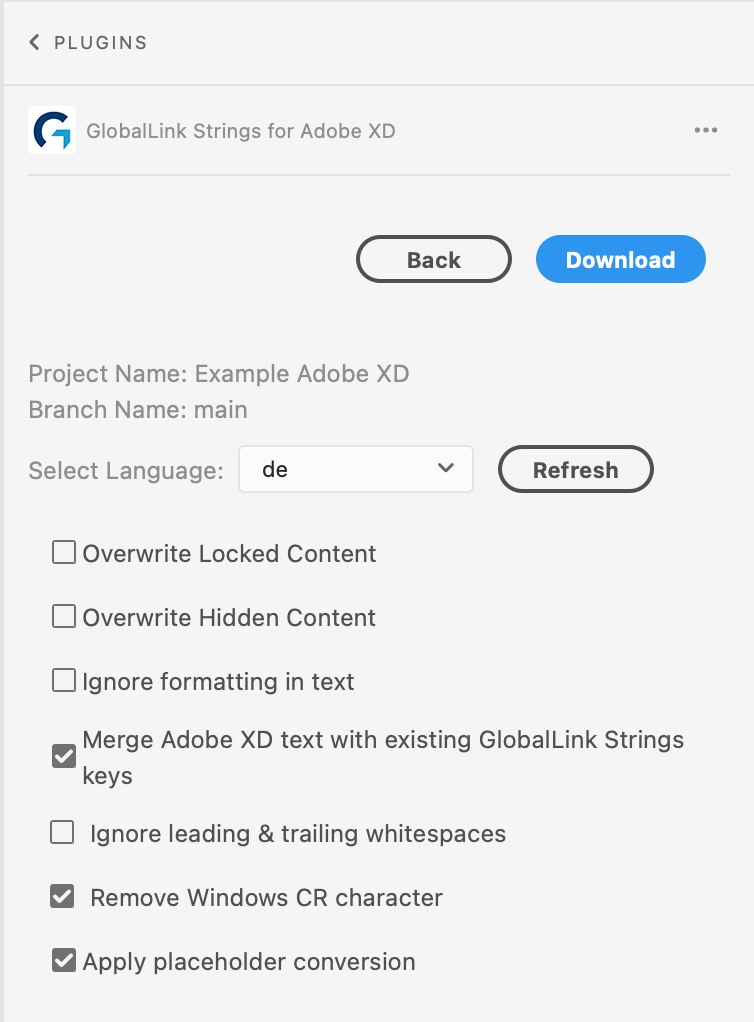
Download Options
- Project Name is set to the project with which the plugin is currently linked via the API token (not editable)
- Branch name shows the Branch that is configured for the plugin as download source (not editable). Please note this field is only visible when the linked project has Branching enabled.
- Select Language for Download allows users to select the target language to be downloaded. Please note that the Download button will not be active until a target language is selected (none is selected by default)
- Mode determines if strings from target or draft translation values are populated (by default Target values plus Drafts will be populated)
- Overwrite Hidden Content determines if the hidden (close/open eye icon) content is included in scope (by default excluded)
- Overwrite Locked Content determines if the locked (padlock icon) content is included in scope (by default excluded)
- Ignore formatting in text: if you ignored formatting in text during upload, you will need to apply this setting to download translations. You will also need to manually re-apply any formatting once translations are downloaded.
- Merge Adobe XD text with existing keys allows the linking of text elemnts missing GL Strings keys to an existing key in the connected project. Please note, the text matching to the source text in your project may not work or may give false positives if the file is (partially) translated.
- Ignore leading & trailing whitespaces removes any leading or trailing spaces from your strings when you download them from GL Strings into your AdobeXD file.
- Apply Placeholder Conversion converts embedded placeholders as found in content downloaded with the mapped text as set in the plugin via Placeholders Replacement.
❗ Important Notes
- Please note that the Adobe XD components will not be translated automatically. You need to either double-click the component to enable editing OR select the text(s) inside the component and only download the translations to it. For more information about XD components, see Adobe's documentation.
- Please be aware that translation download for very large files may take several minutes.
- Please note that any content that has 3 underscore characters (___) at the beginning of the element or page name is excluded from the scope.
- The translation download will overwrite the source text in your file. It is recommended to create a copy of the design elements in scope for the translation process. You can also revert back to your starting point by selecting your source language and downloading it again.
The Download button starts the download immediately. The button is only active if there is a download language. During the download process, an activity log will inform you about the progress and any errors.
Back to Top
How to upload only translated screenshots
If you want to upload screenshots of your translated Adobe XD file back to GL Strings, for example, if you want somebody to review the translation in-context, follow these steps:
- Go to Download and select a language
- After the download is finished, go to Upload and select the language again, but make sure that you only select Screenshots in the upload options.
If you want to upload only selected content, make sure to select artboards. Otherwise no screenshot will be uploaded from selected content.
Back to Top
Inspect and Keys
Inspect & Edit Keys allows users to view the GloablLink Strings keys connected to specific text in the respective design file. Users can also create new strings Ids by removing the current key and setting a new one via the plugin.
- Select the element of the design file to display string Ids in the plugin
- Click on the Key Name text field to edit the key name, then select the checkmark to approve for upload (if an Id already exists for a given text on GL Strings, users can search and apply that specific Id)
- Once key names are updated, click Upload
❗ Important Note
- Screenshots are not automatically uploaded with strings when using the Inspect & Edit Keys option. Users can manually assign strings on the GlobalLink Strings dashboard using the screens tag. See the tags page for more info.
Back to Top
Placeholders Replacement

When transferring text from design files over app strings via GL Strings, it is often necessary to add certain variables or placeholders to the text so it is usable in the app (e.g. replace numbers, counters, dates, time, etc with placeholders such as %d, %s, etc)
However, these variables in the text will appear in the design files which interferes with the ability to match the design to the app 1:1
The Placeholders Replacement option acts as a placeholder conversion. It allows plugin users to replace any variable found in the app's text with a predefined text element. For example, with a mapping of “%d” to “5”, the string “Lisa bought the %d apples” would appear as “Lisa bought the {5} apples” in the design file.
Replaced/Converted placeholders in the design file are written inside curly brackets {} to prevent any accidental edits to these text fields.
- Enter the placeholder text (e.g. %d) as found in the app strings to the Placeholder column in the plugin
- Enter the desired text (e.g. 5) the placeholder should be replaced with on download in the Replacement Text column
- Click the Checkmark to save this conversion and add more
- Click Save to save all mapped Placeholder Replacements
Back to Top
Check and Align file
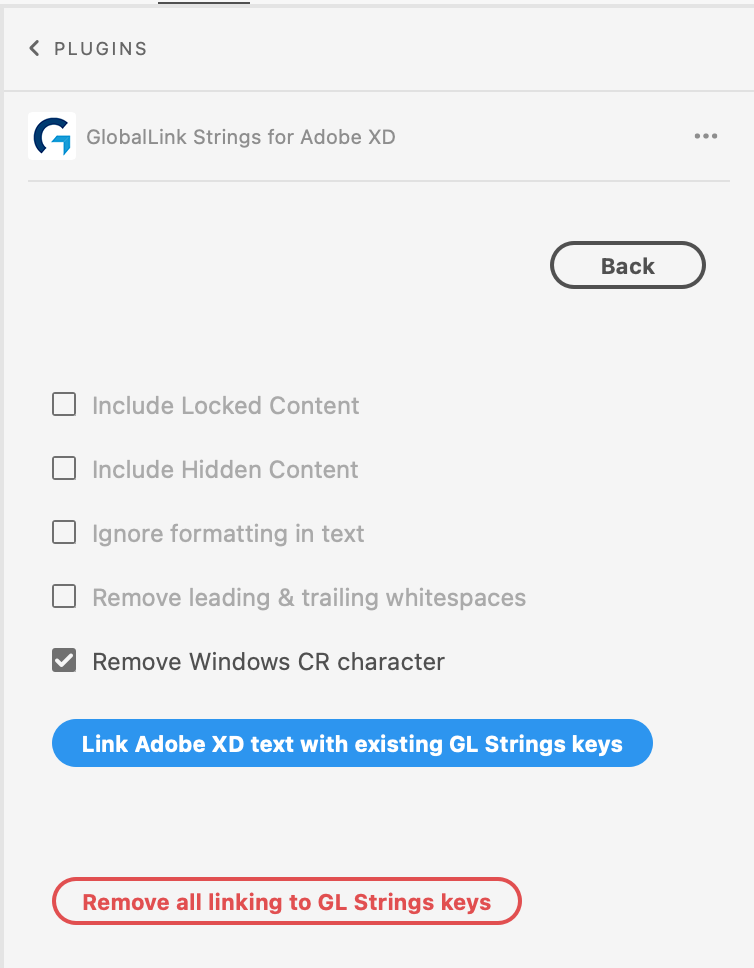
The plugin option Check & Align File helps with two things:
- Link Adobe XD text with existing GL Strings keys: this option tries to match the text in the file with existing keys in the connectex project. It's similar to Merge Adobe XD text with existing GL Strings keys in download options, but is not limited to a selected scope.
- Remove All linking to GL Strings keys: this option clears the file of any information that links particular text instances with keys. It's useful if you want to start over and upload content into a brand new project. It is a nuclear option and should be used with caution.
Back to Top

