This article will show users how to work with screenshots on GL Strings. Users will be able to access and navigate through uploaded screenshots and tagged strings, find specific screenshots, reorganize or verify them. To learn how to upload new or edit existing screenshots manually see the Uploading & Editing Screenshots documentation.
Table of Contents
- Access Screenshots on GL Strings
- Screenshot Modes on GL Strings
- Screens Menu
- Additional Screenshot Options
- Delete Screenshots
Access Screenshots on GL Strings
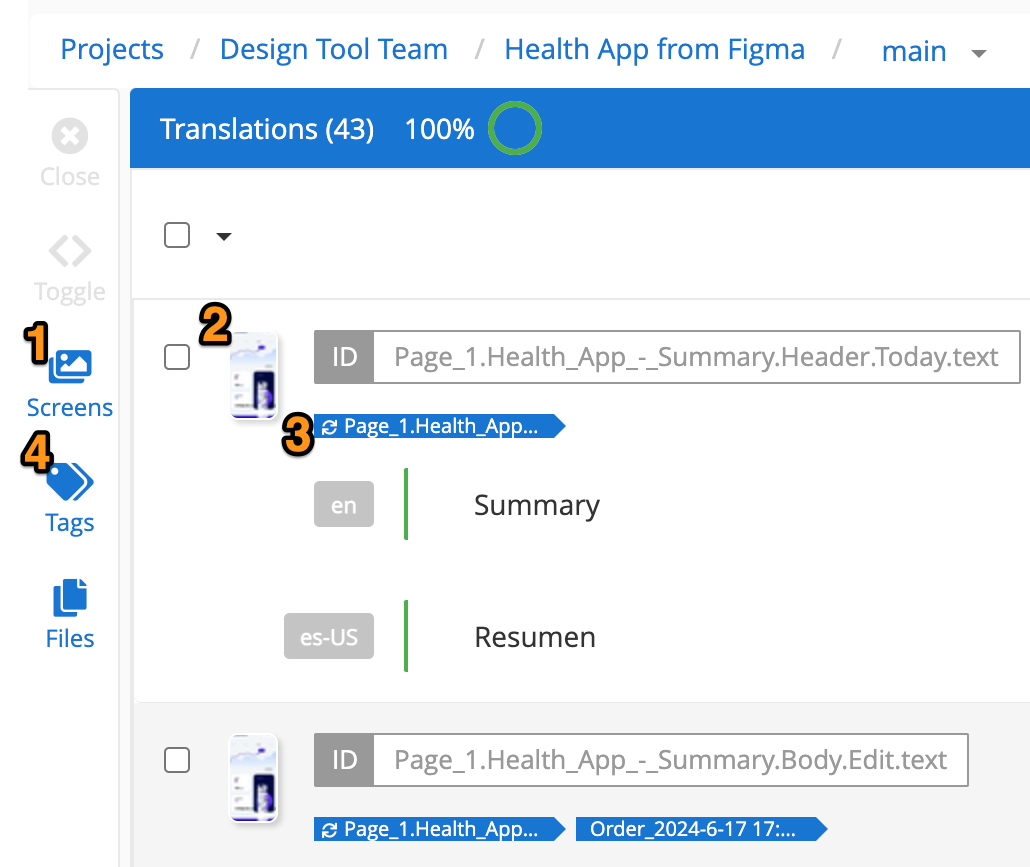
- Via the Screens list in the sidebar (screenshot below, marker 1) - Click the Screens button on side menu, then select the specific screen for viewing (this view will show all strings associated with a screen)
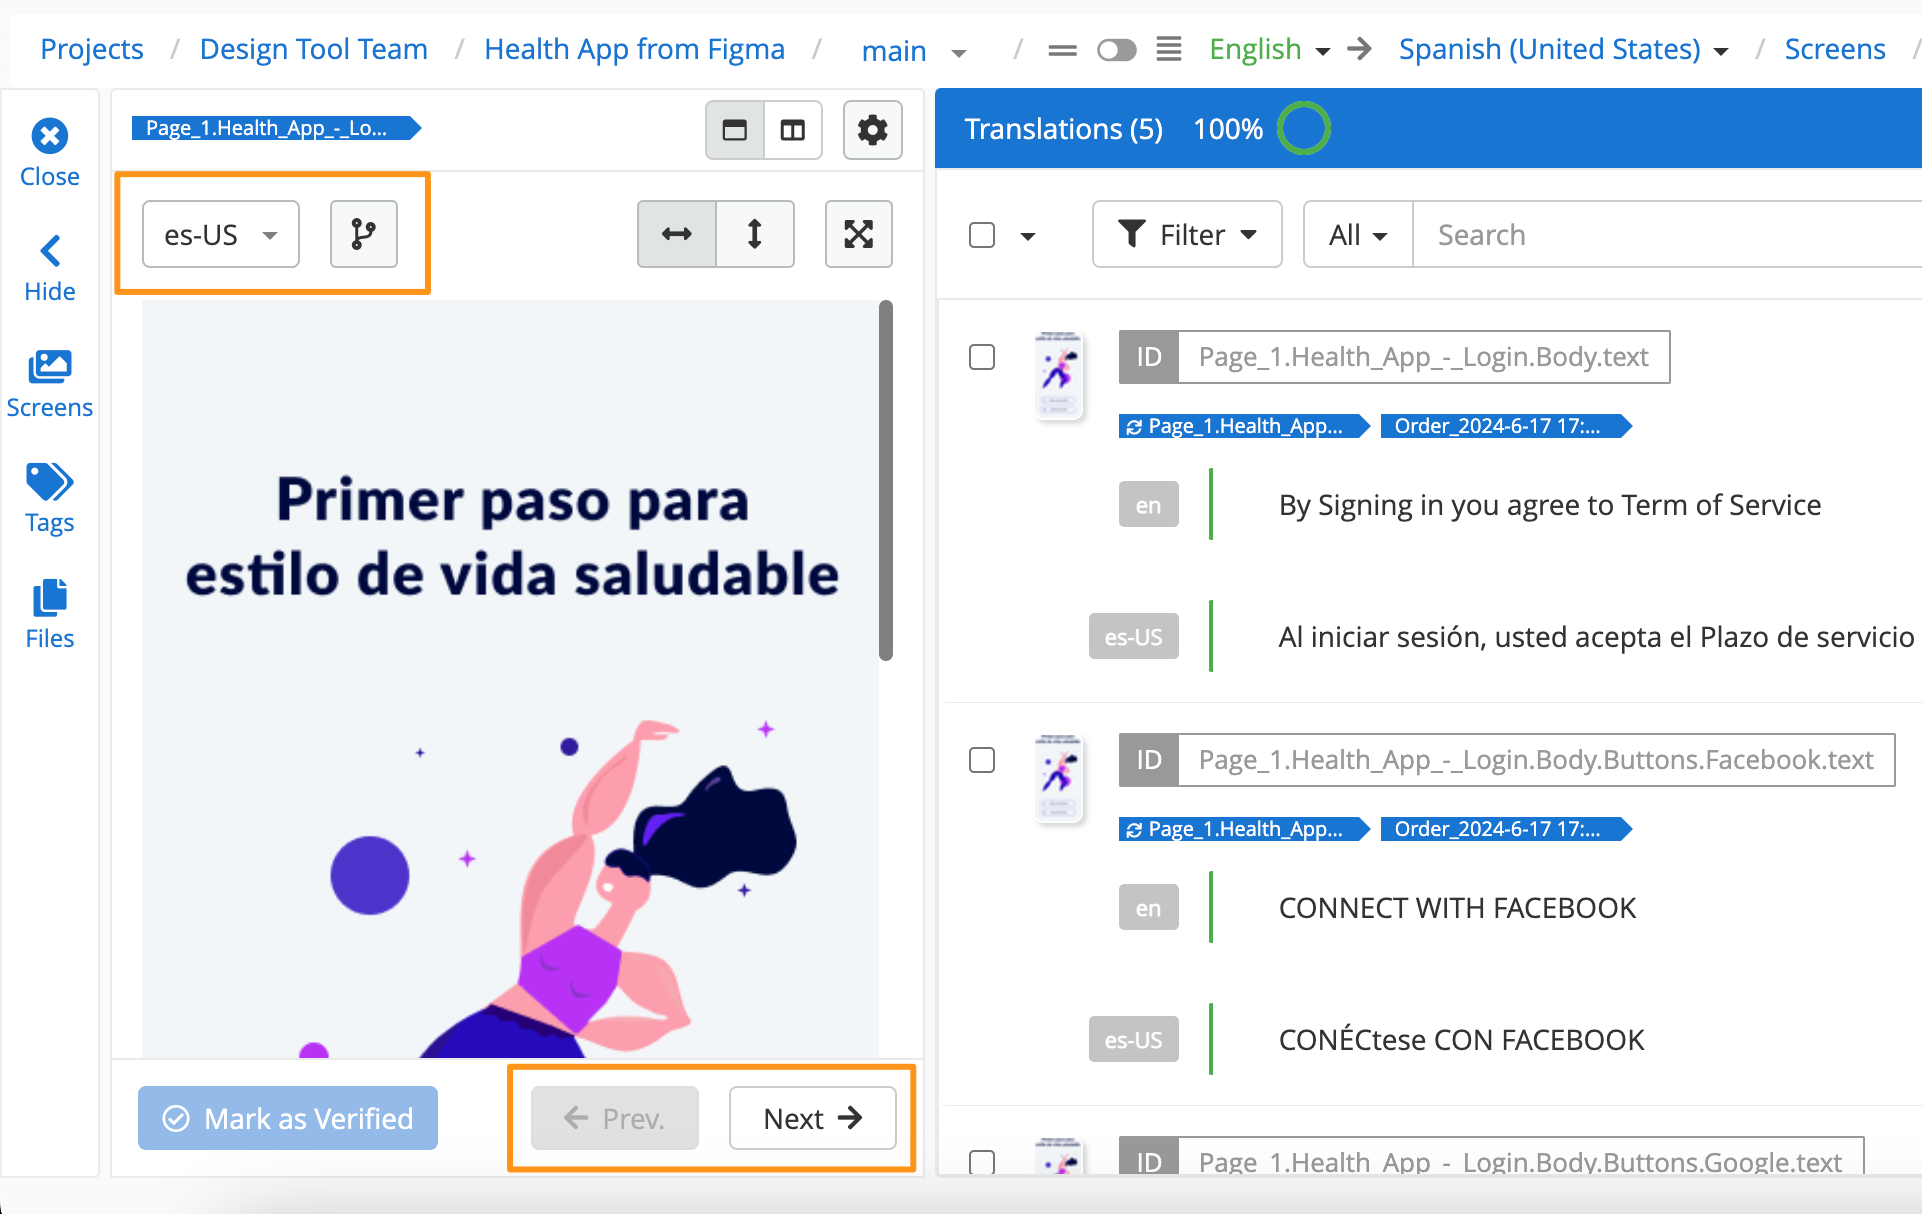
- Via the Screen preview thumbnails (screenshot below, marker 2) - Click the screen thumbnail next to the string in the Editor View (this view will display the screen associated with that string or, if there is more than one, all screens associated with a specific string in the Screen tab overview)
- Via the Tag (screenshot below, marker 3) - Click the tag associated with the string in the Editor View (if there is a screen associated with the tag, this view will show all strings associated with a screen)
- Via the Tag list (screenshot below, marker 4) - Click the Tag button on the side menu. Tags with screenshots will have a preview thumbnail. The tags list can be filtered to show only those tags with a screenshot (this view will show all strings associated with a screen)
Back to Top
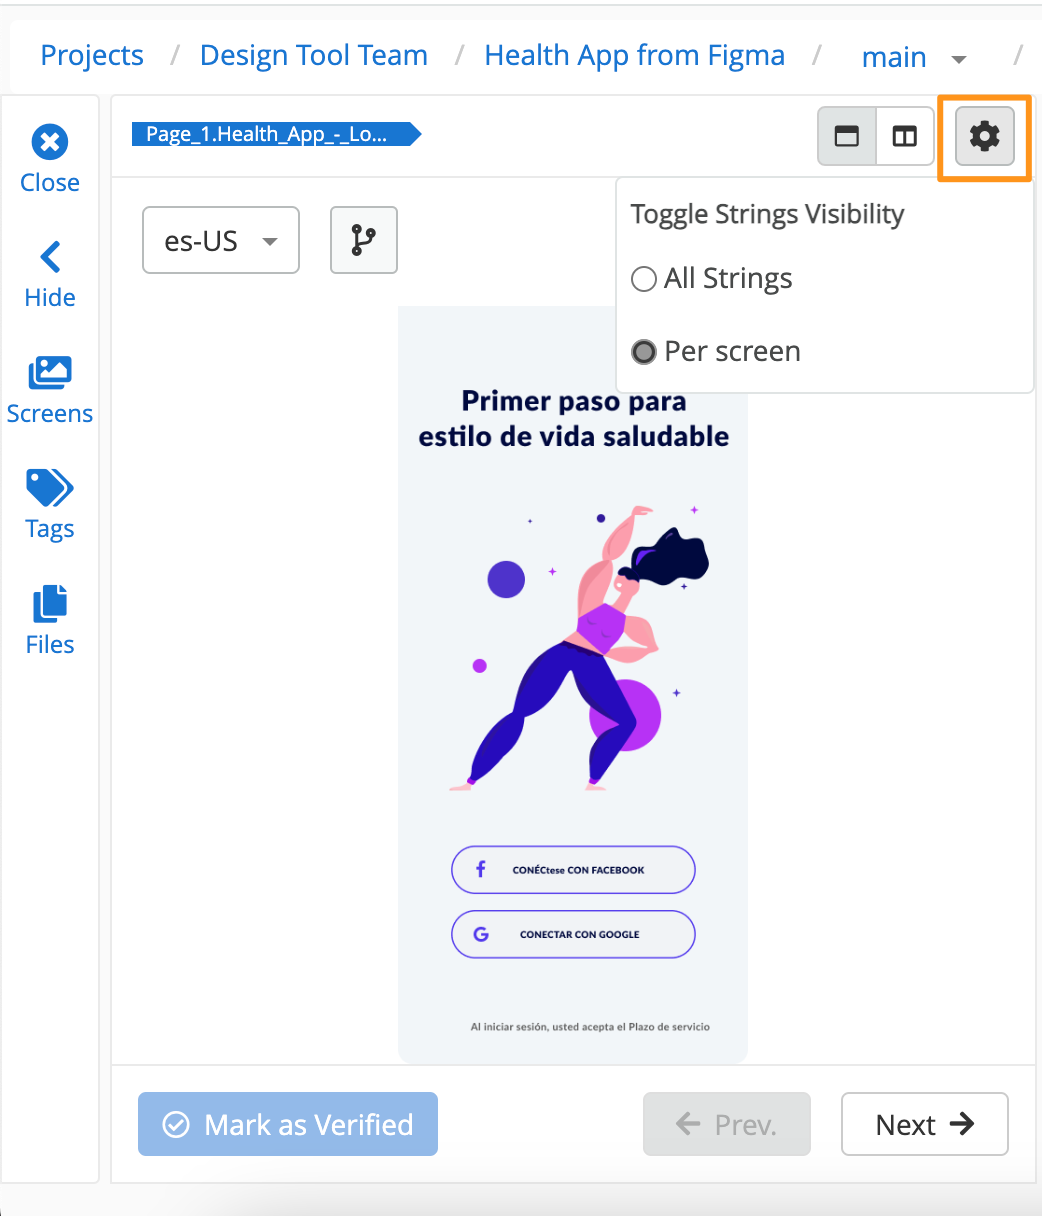
Screenshot Modes on GL Strings
There are 2 different modes to access screenshots uploaded to GL Strings: All Strings and Per Screen. The user can switch between those modes at any time using the settings in the Screenshot bar which is visible when the in-context view is opened.
Mode 1 - All Strings
Access Screens for a Given String Selectively
The All Strings mode makes it easy to access any screenshots associated with a particular string at any point in the workflow. It’s ideal for accessing screenshots for a specific subset of your strings e.g. when a filter or search is applied.
With this mode, screenshots can be accessed at any point while working on the content in the Editor. While the Per Screen mode will filter the list to only show those strings associated with a given Screen, in the All Strings mode whichever filter, search, or scroll position is currently applied will remain as is.
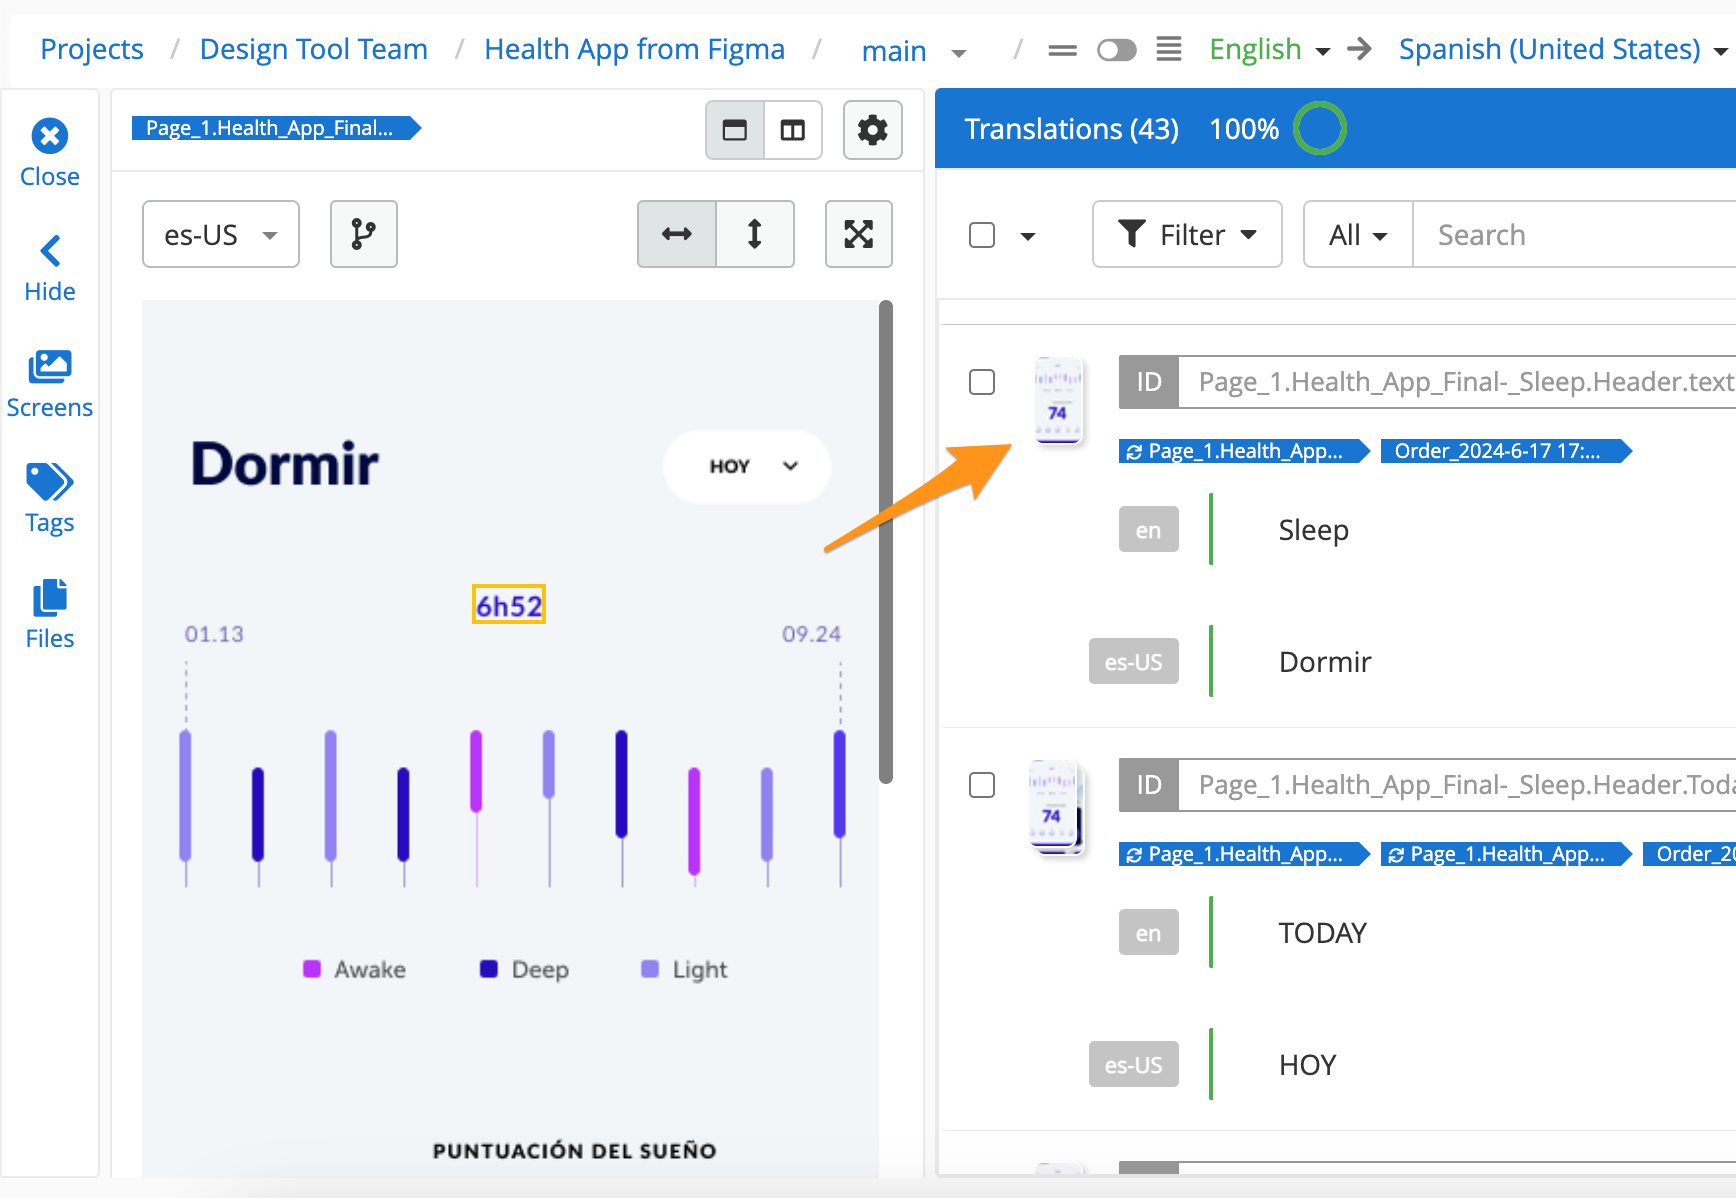
This mode is active by default if a screenshot is accessed through the screenshot preview thumbnails in the Editor next to the string.
Multiple/Stacked Thumbnails and the Screens Tab View
If there is more than one screenshots associated with a string, this will be represented by a stack of thumbnails. Instead of opening the screenshot in the in-context view directly, clicking on stacked thumbnails will open the Screens Tab view first. This view shows all available screenshots associated with a string. From this view, an individual screen can be selected to display in the in-context view as usual.
- Click on a stacked screen thumbnail
- Switch between the available screens by selecting any of the available numbered boxes in the bottom
- Click the Tabs icon in the bottom, right-hand corner to navigate the Tabs view that shows a preview of all screens associated with the selected string
- Optional: Use the Language toggle to view the source language variant of the screenshot or any other language variant via the dropdown (if available)
Mode 2 - Per Screen
Navigate Through Strings Sequentially
This way of accessing and navigating between Screens is best used for a holistic linguistic review process. The Screens can be ordered in the same sequence they appear in the app itself, thereby allowing reviewers to mimic the user journey through the app.
If the in-context view is opened and this mode is selected, the list of strings visible in the Editor on the right, next to the screen, will be filtered to only show those strings associated with the selected Screen. The “Previous” and “Next” buttons found in the footer of the in-context view are only visible in Per Screen mode.
This mode is active by default if a screenshot is accessed through the Screens list or by clicking on a tag in the Editor.
- Click the Screens button on the side-menu to access the Screens list
- Click on one of the Screens in the list - this will be the starting point for sequential navigation
- Use the navigation arrows at the bottom of the screen to move to the Next or Previous screens
- Optional: Use the Language toggle to view the source language variant of the screenshot or any other language variant via the dropdown (if available)
Limit Screen-by-Screen Review to Specific Screens
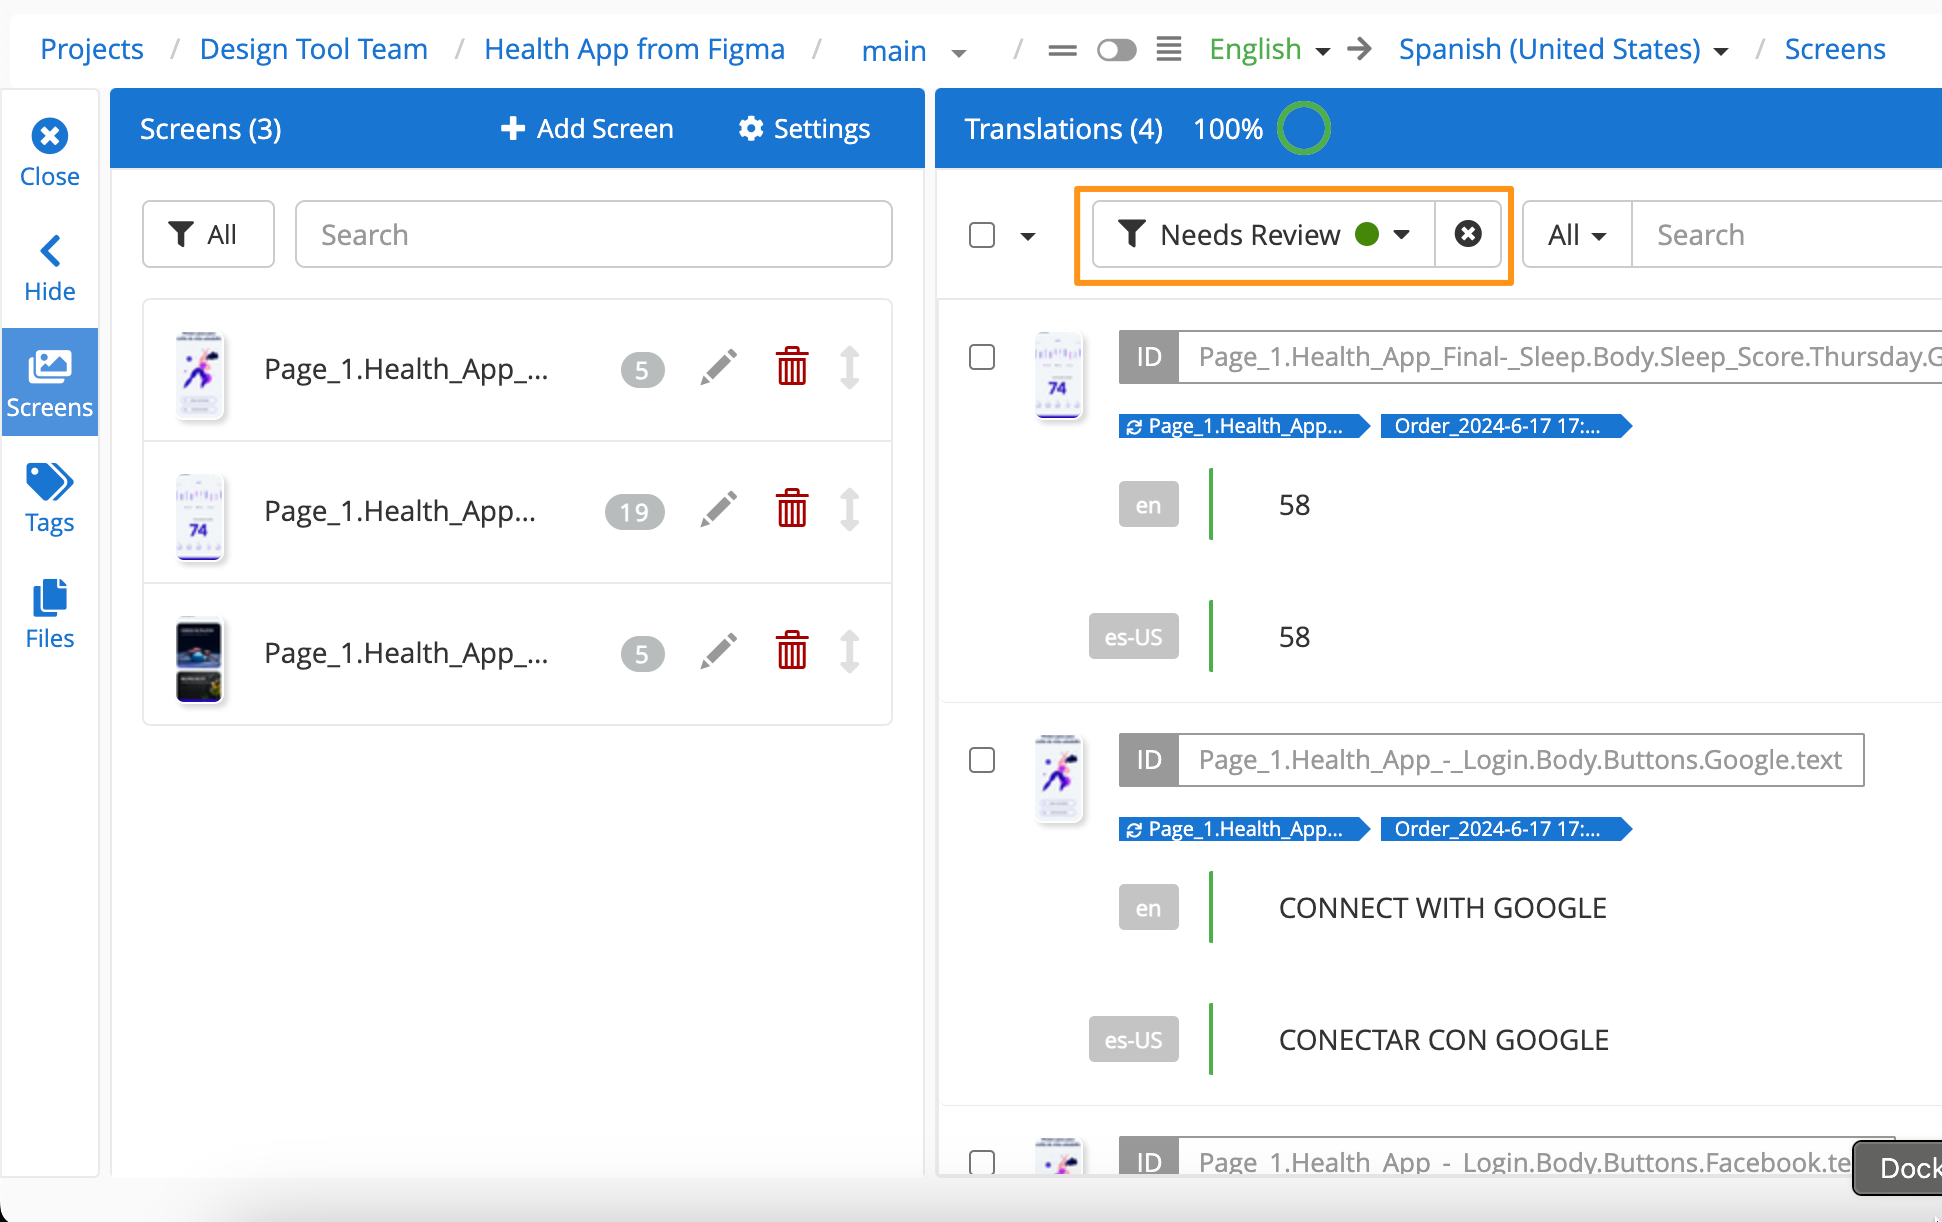
The Screens list also corresponds to any filter applied to the overall Strings list e.g. if a user filters for Needs Review, only the Screens with strings in the Needs Review state will display in the list and in the Prev and Next navigation. The filtered Screens lists is especially helpful in a scenario with multiple rounds of screenshot review. It ensures that reviewers are pointed directly to just a specific subset of Screens.
Back to Top
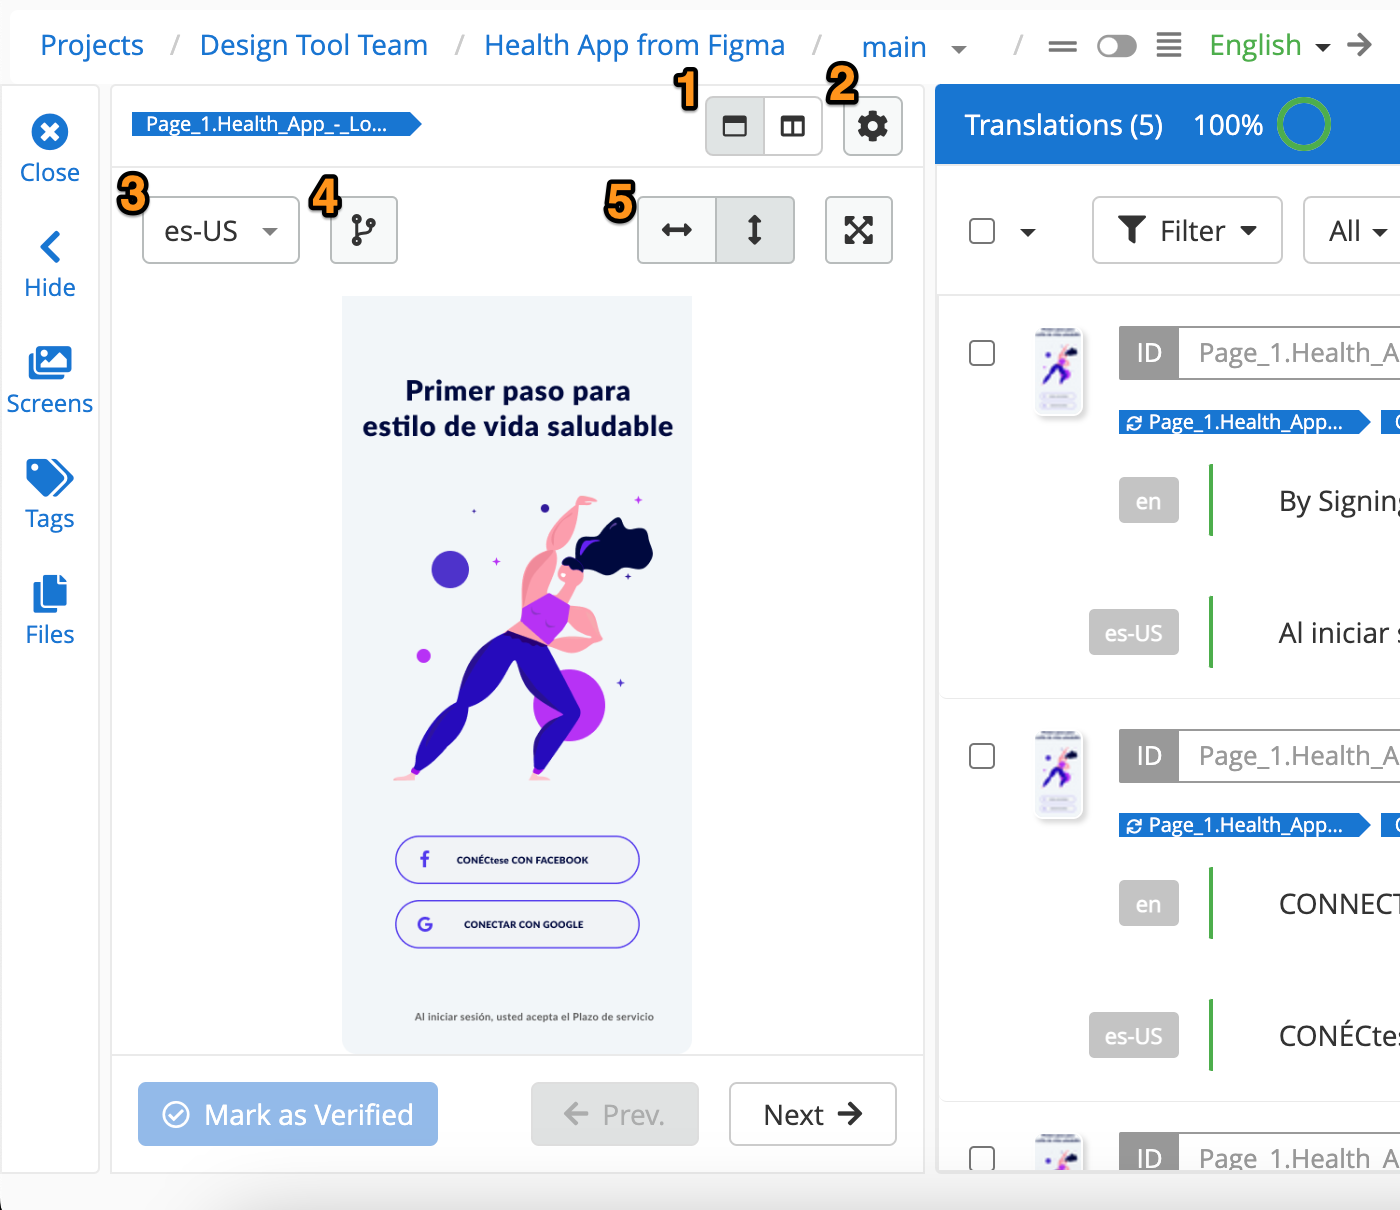
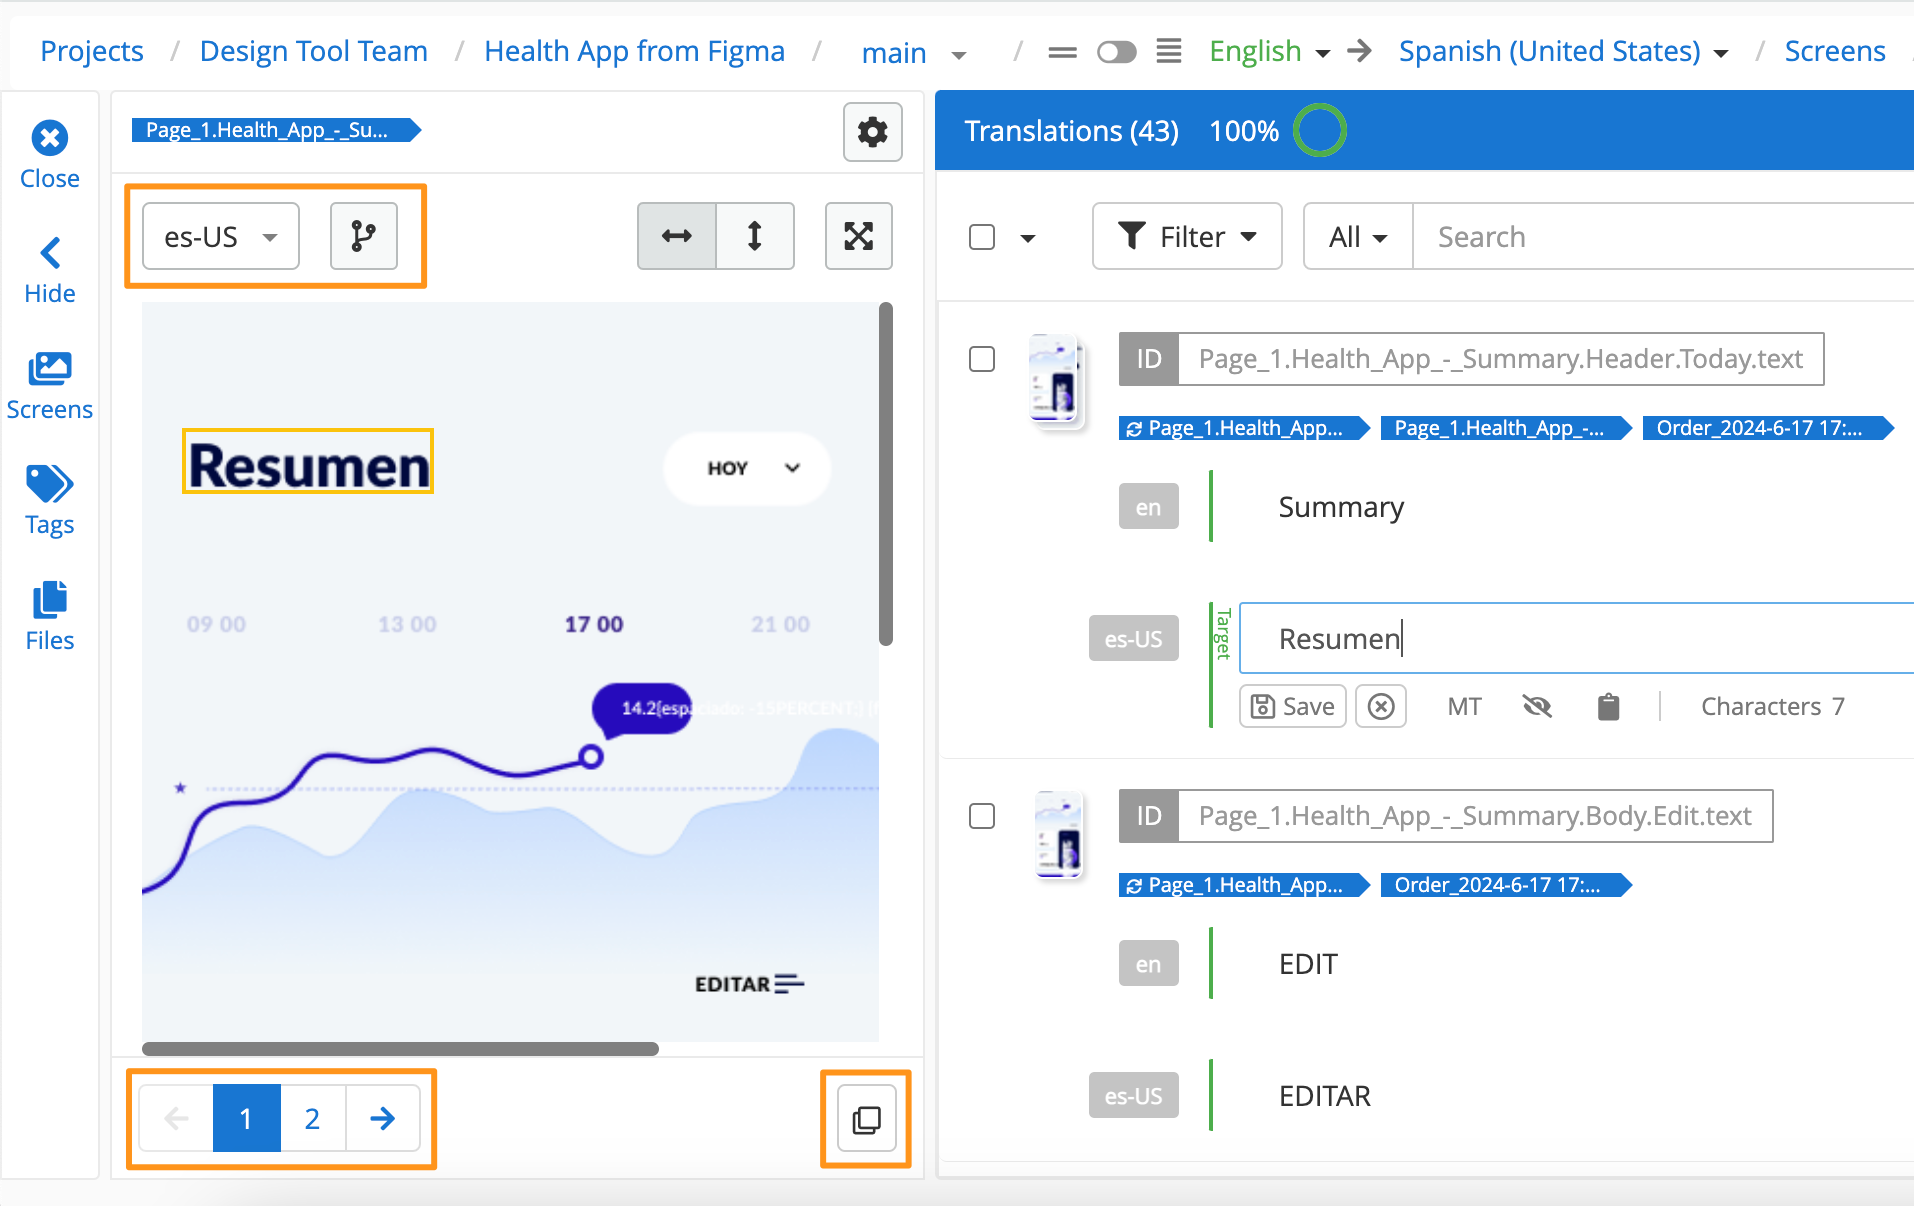
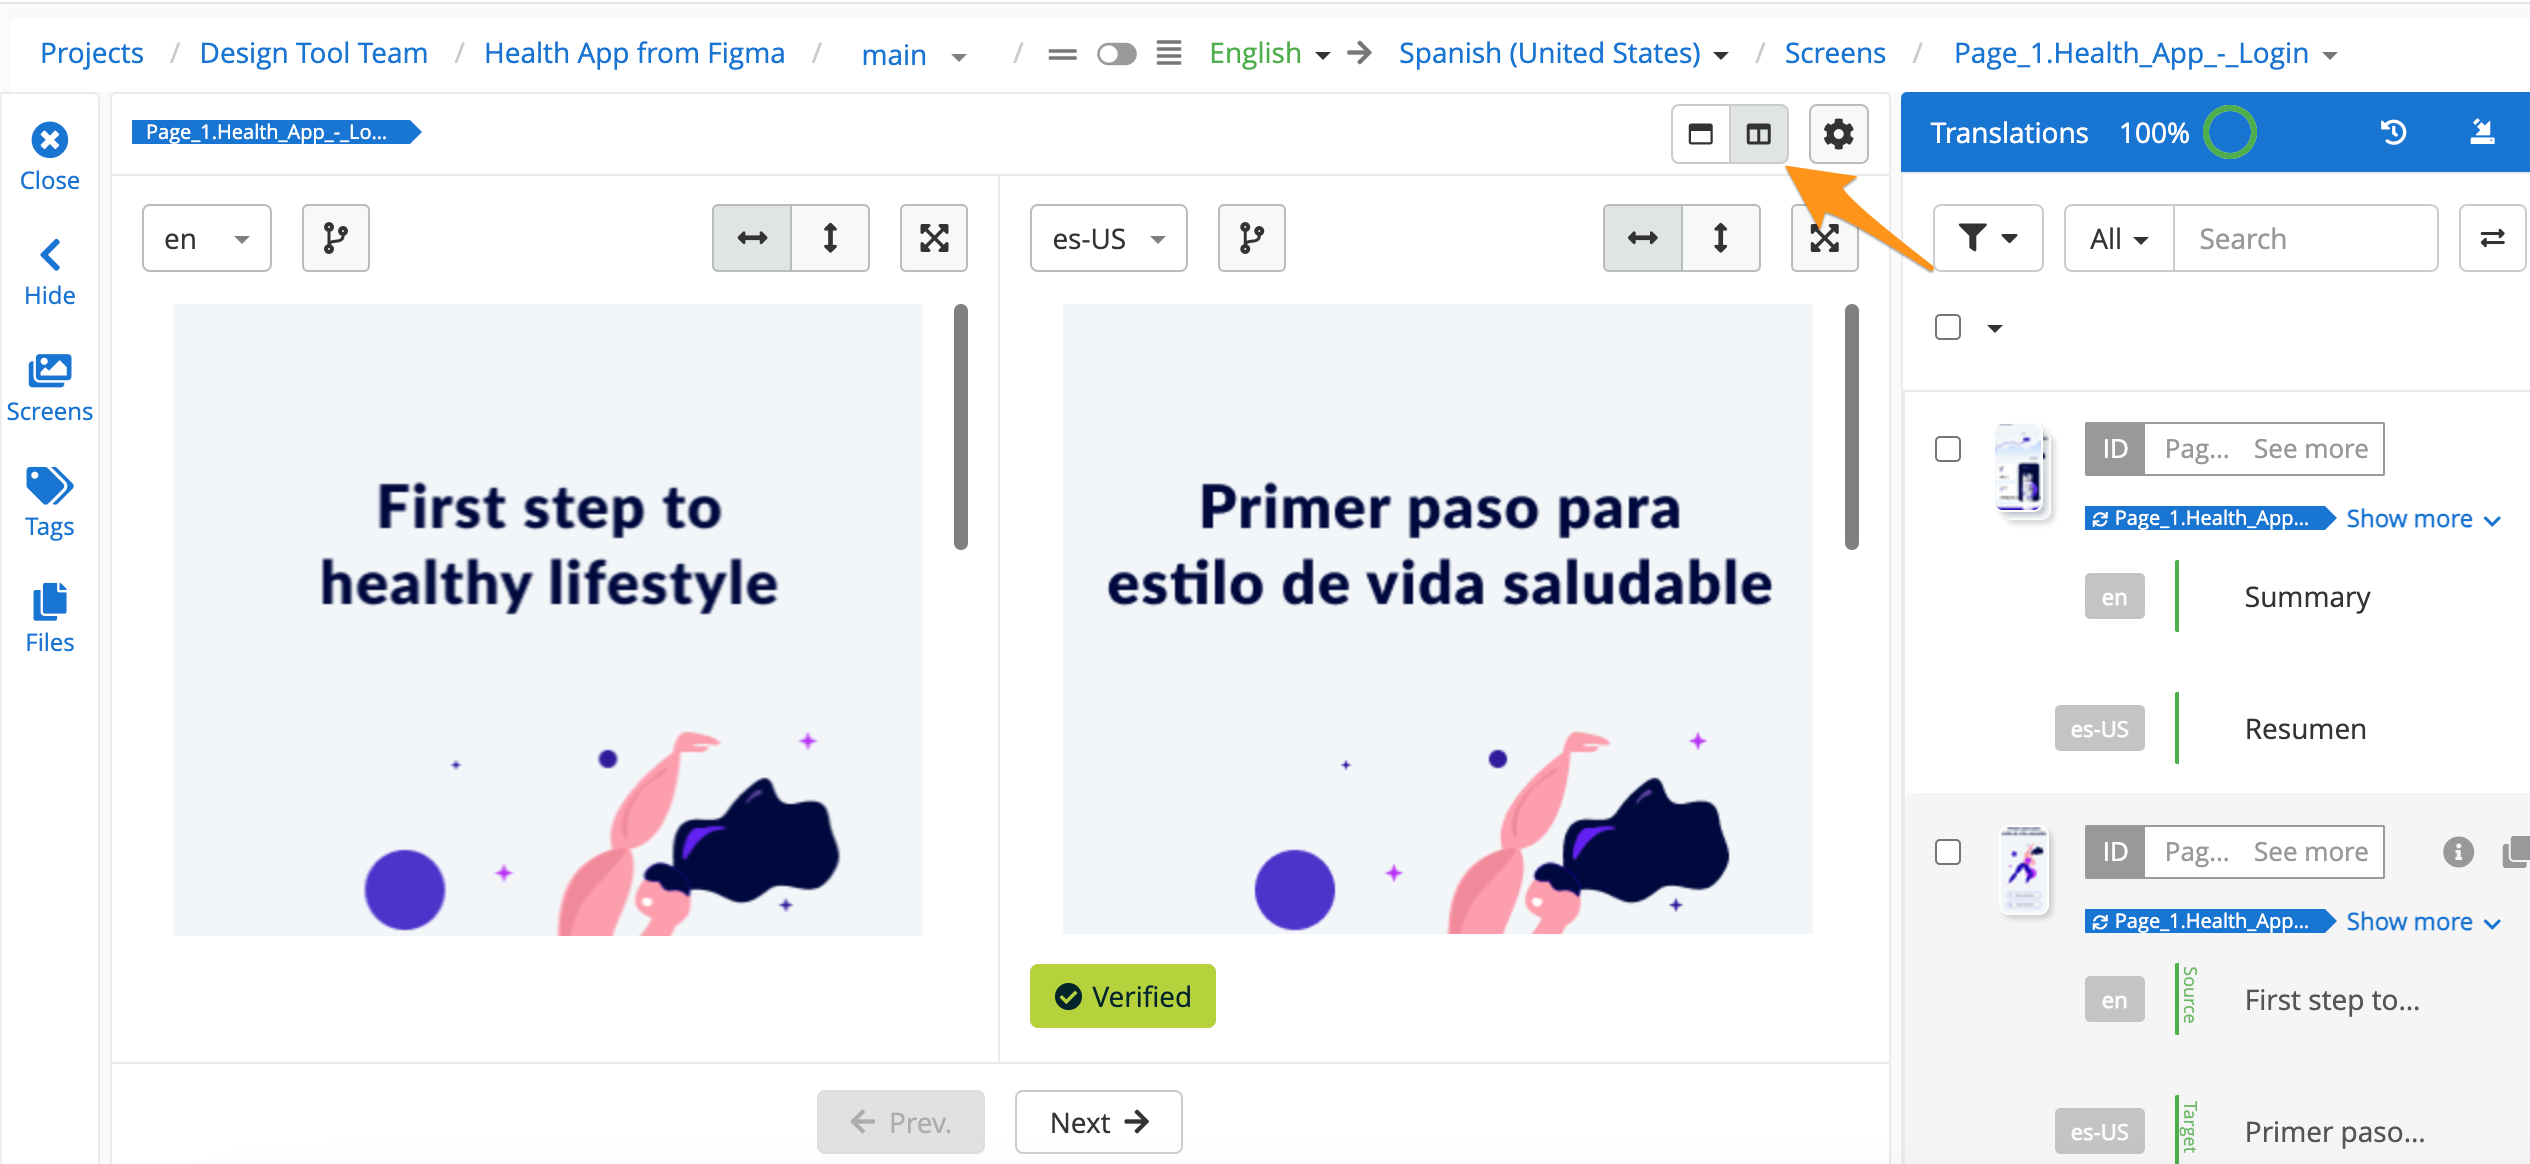
- Single vs Side-by-Side View view a screen for one language or enable side-by-side to view and compare the translated screen with the source screen
- Settings switch between viewing all strings in a project (All Strings) and the strings per screen (Per Screen)
- Language a dropdown allowing users to view screens in each language (when translated screens are available)
- Variant Information basic screenshot information. Details include:
- Language: which language the screenshot is in
- Version: which version of the app the screenshot was taken from
- Device: which device the screenshot was taken on e.g. an iPhone
- OS: from which operating system the screenshot was taken e.g. Mac OS
- Resolution: the resolution of the screenshot
- Created: the date and time the screenshot was created
- Variants: use the dropwdowns to view the different screens options for different variants e.g. iOS versus Android screens.
- Edit Variants edit the screen variant, including the name, strings, etc
- Upload Variants upload another variant of the screen
- Full Screen full screen, fit to width or height
Back to Top
Additional Screenshot Options
View Translated Screenshots Side-by-Side
Enable the Side-by-Side Screenshot View to display the translated screenshot and source screenshot side by side.
Find Specific Screenshots
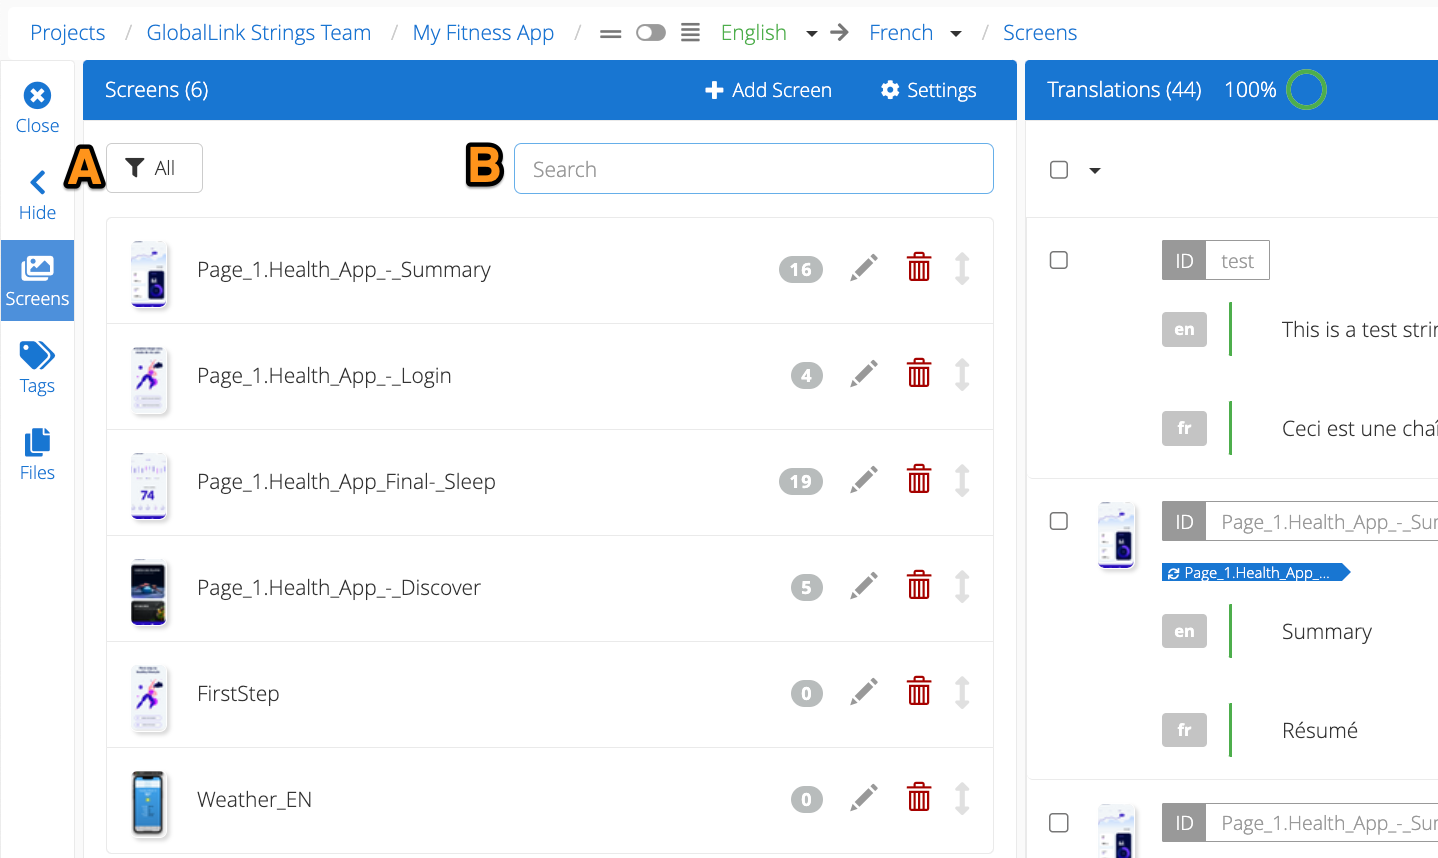
- Click the Screens button on the side-menu
- Use the filter (marker A) to view those screenshots that meet a specific criteria (i.e. only available in the source or target language, verified source screenshots, verified target screenshots, etc.)
- Use the search bar (marker B) to find specific screens. This search will return screens with the search value in the screen name
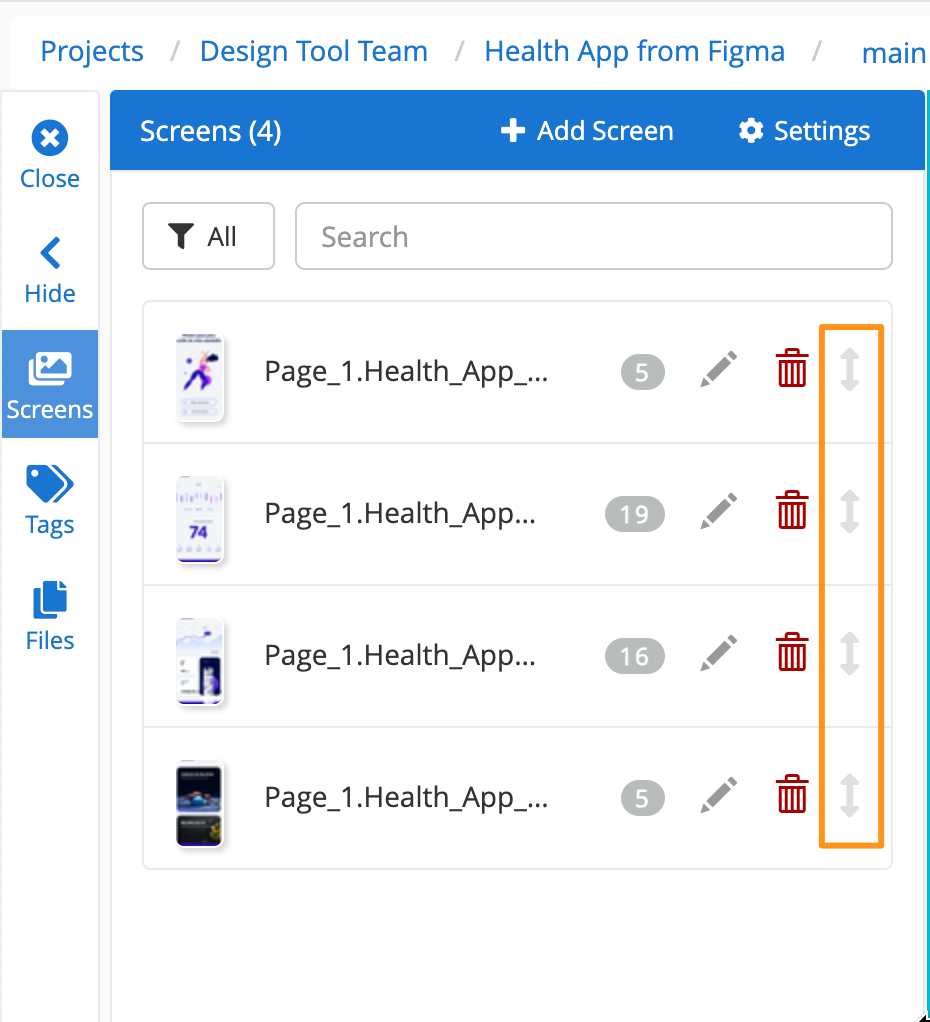
Change or Reorganize the Screenshot Display Order
This will change the order in which screens appear when navigating through strings sequentially
- Click the Screens button on the side-menu
- Click Settings then select the appropriate screen sort option

- Custom is the default setting and this sort order is managed by reorganising screens using the arrows to the right of the screens list
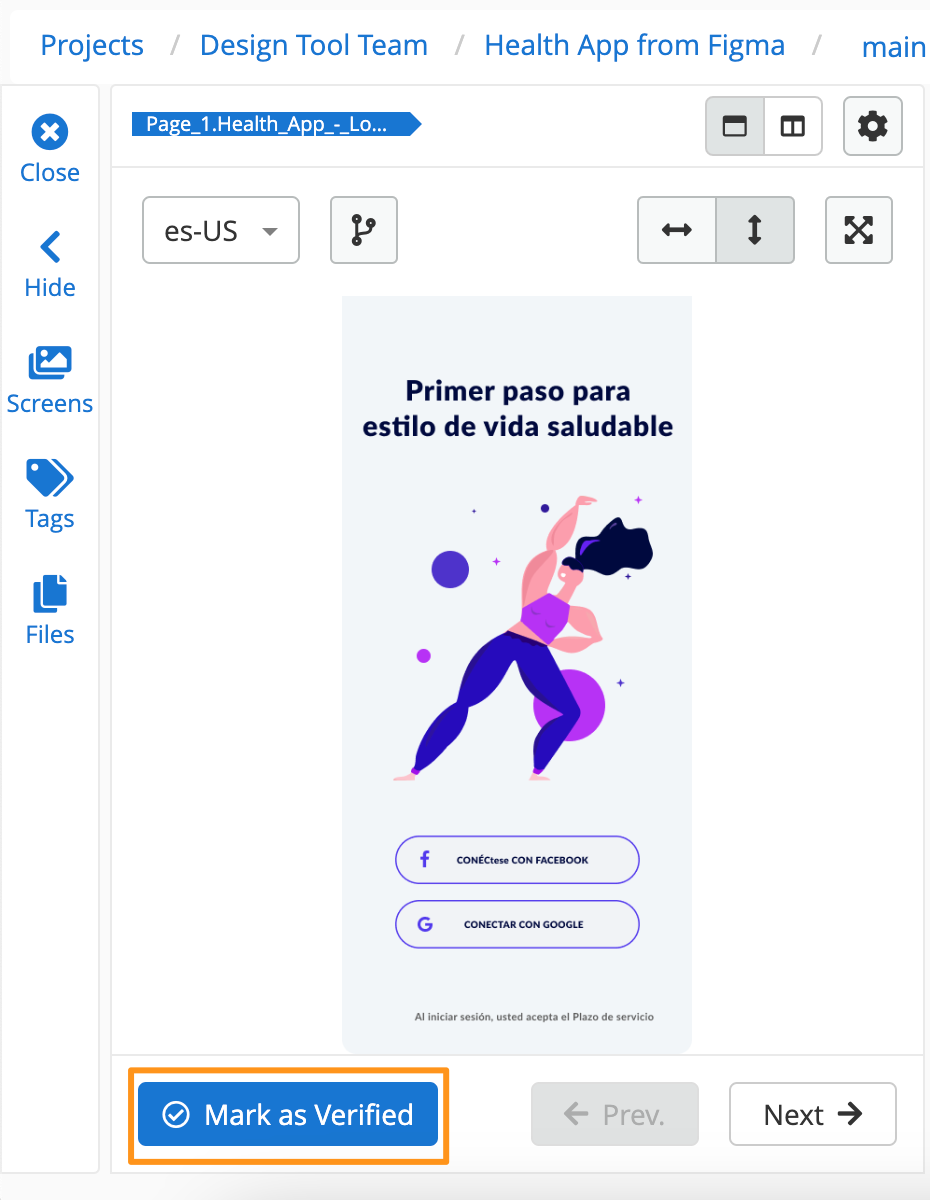
Mark Screenshots as Verified
As part of the screenshot review process, users can mark screenshots as verified or unverified to indicate the review status. This option is only available when the selected language in the Editor View matches the screenshot language.
To mark an individual screenshot as verified:
- Open the screenshot through the Screens list or by clicking the thumbnail next to the string and click on Mark as Verified. To remove the verified status, click on the Verified button.
To mark multiple screenshots as verified:
- Open the Screens list, select all or multiple screenshots from the list and click the checkmark icon. To remove the verified status, open a screenshot and click on the Verified button.
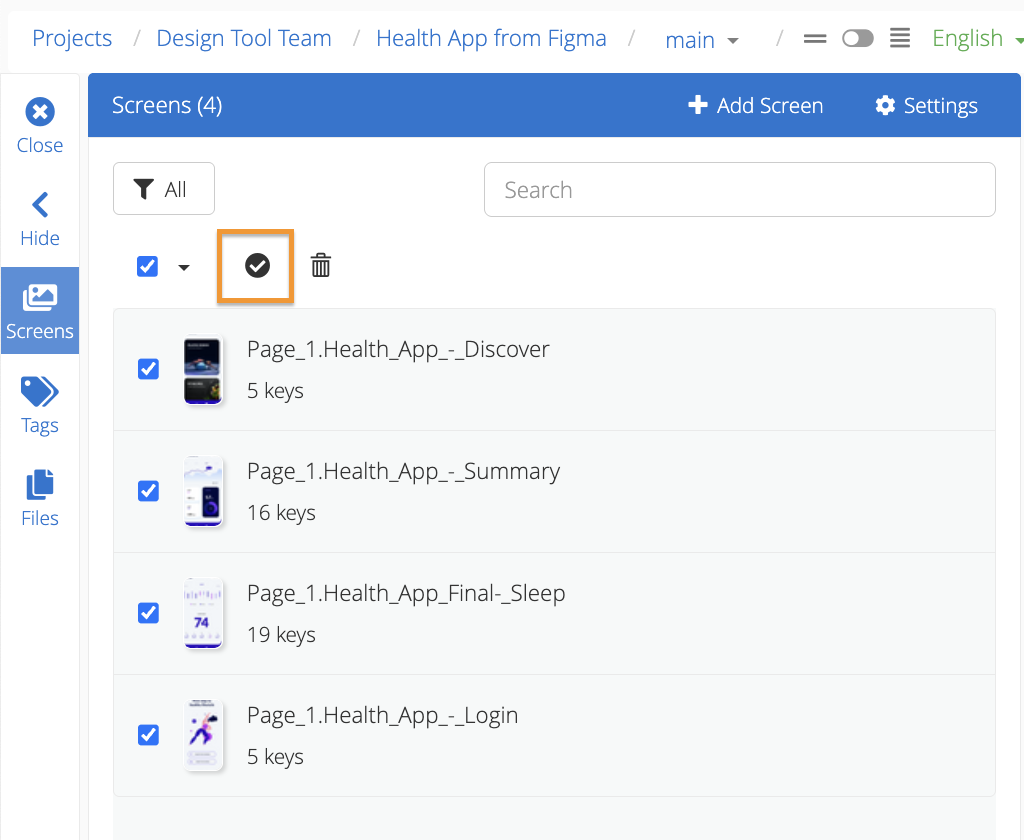
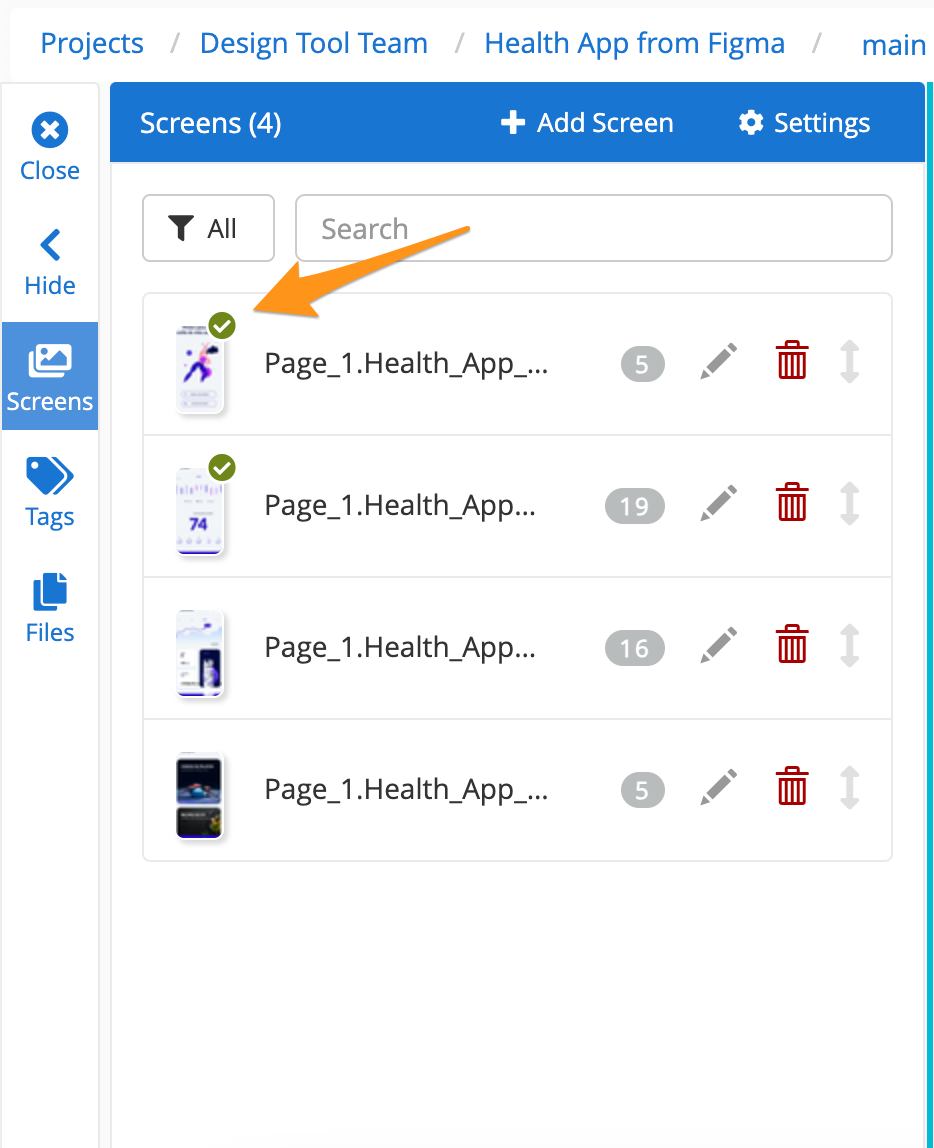
The Screens list also provides an overview of the screenshots verification status. Verified screenshots will have a green checkmark on top of the thumbnail, whereas unverified screenshots won't.
Use Screenshot Rules
Teams can enable screenshots rules to automate the screenshot verification process. These rules allow teams to define when a screenshot should be marked as verified or unverified. It also automates workflow status updates when a new screenshot variant is uploaded to GL Strings.
Back to Top
Delete Screenshots
-
Click the Screens button on the side-menu
-
Hover over the screenshot you want to delete
-
Click the trash can icon
-
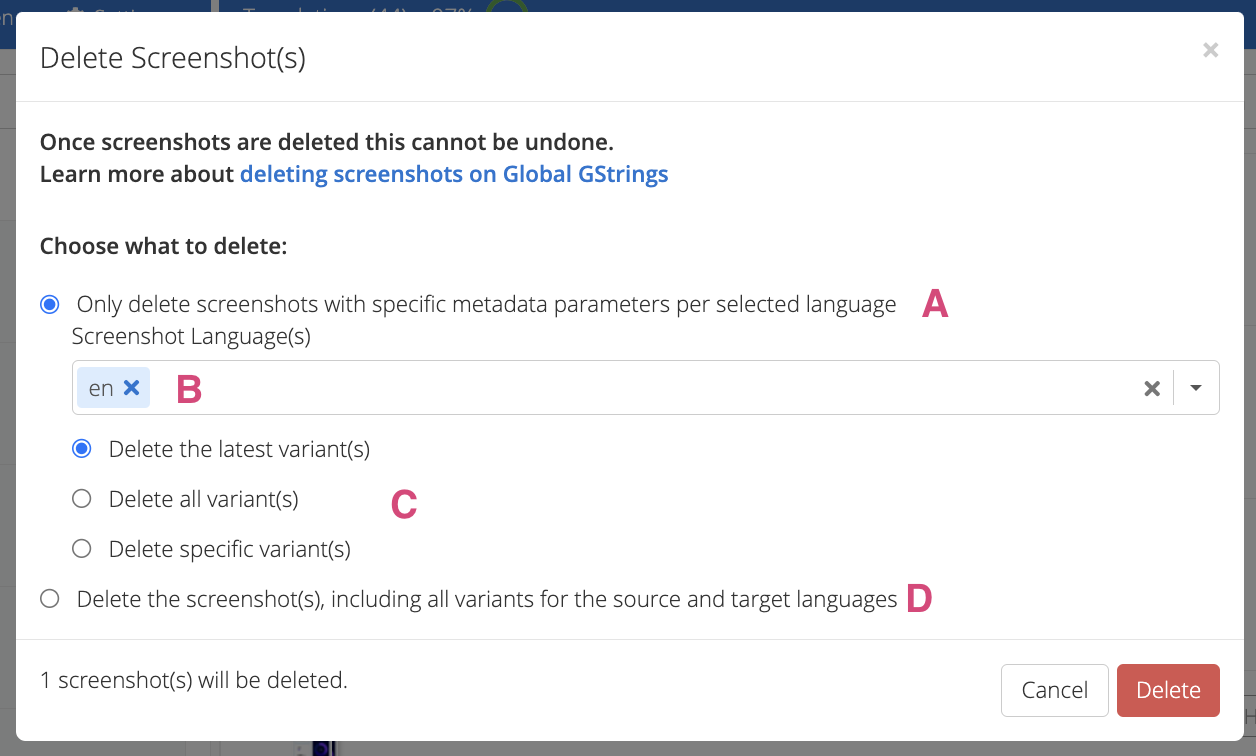
To delete specific variants or screenshot languages, keep the option to Only delete screenshots with specific metadata parameters per selected language selected (screenshot below, marker A), and then:
- Select the screenshot language(s) that you wish to delete from the dropdown (marker B)
- By default, only the latest variant will be deleted. However, you can choose to delete all variants or only specific ones (marker C)
-
To delete all variants and all screenshot languages of the selected screenshot, select Delete the screenshot(s), including all variants for the source and target languages (marker D)
-
Click Delete
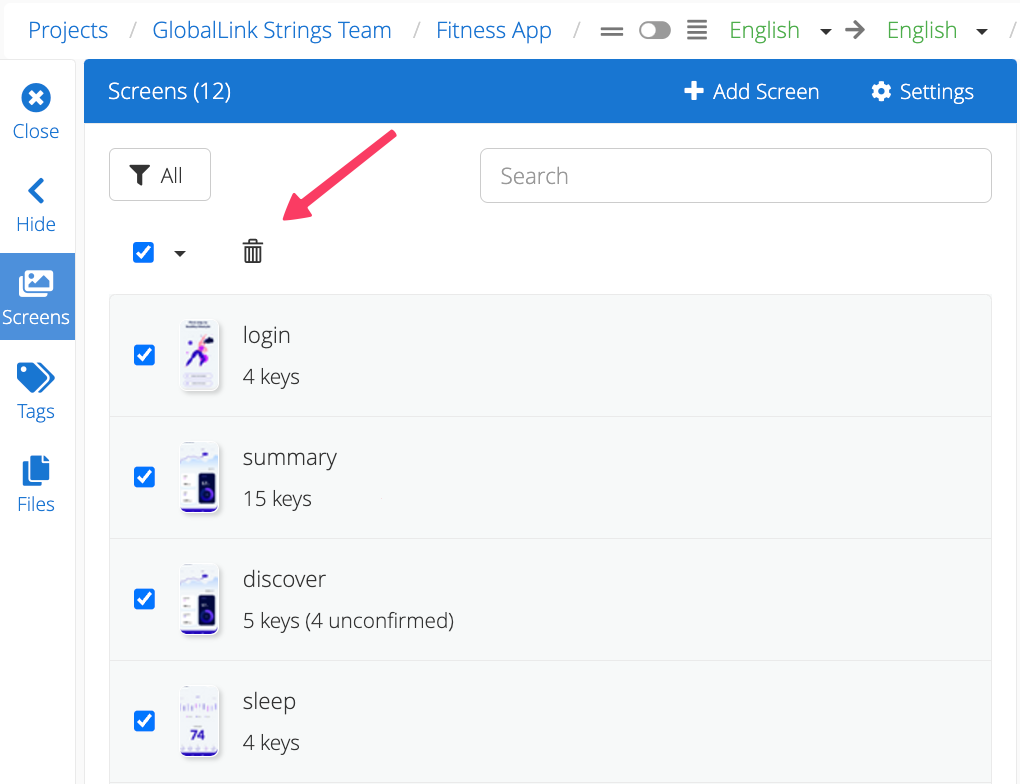
Delete Multiple Screenshots
- Click the Screens button on the side-menu
- Click the checkbox at the top of the Screens list to select all screenshots.
- Click the trash can icon
- Next, select which screenshots languages and variants you want to delete (steps 4 and 5 from the section above)
- Click Delete
Back to Top

