Apply a pre-defined or custom filter to quickly find and manage keys.
Table of contents
- Predefined filters
- Custom filters
- Filtering in multilingual mode
Predefined filters
These filters include the following options:
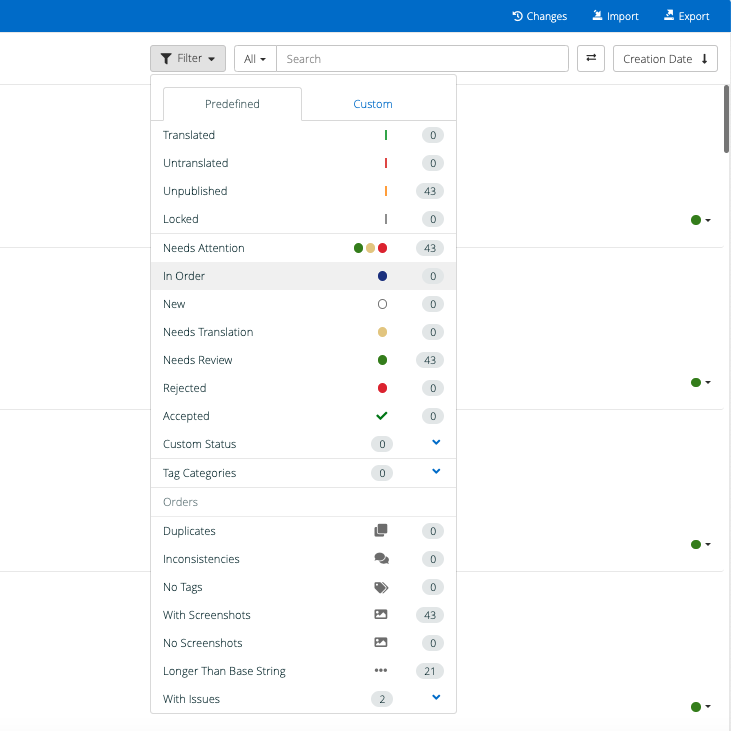
- Translated
Strings that have a target published translation. In case of base language, it means IDs with source text.
- Untranslated
All strings without translation content. In case of base language, it means IDs without source text. Draft strings are not displayed.
- Unpublished
All strings containing draft translations. This filter will also return strings that have both draft translations along with existing target transltions. (The target translations are overwritten when drafts are published.)
- Locked
All locked strings. Such entries cannot be edited until they are unlocked.
- Needs Attention
All strings that have Needs Translation, Needs Review or Rejected status and require linguists' attention.
- In Order
Strings that are included in an active order. Orders are sent to TransPerfect Translations via GL Strings.
- New
New strings added to the project.
- Needs Translation
Strings in Needs Translation status. Strings under this category need to be translated.
- Needs Review
Strings in Needs Review status. These are translated strings that need to be reviewed.
- Rejected
Strings in Rejected status. Rejected strings contain errors and should be reviewed.
- Accepted
Strings in Accepted status. Strings under this category were accepted as final.
- Custom Status
This filter option will only be displayed if your team has created custom workflow statuses. Click on it to open a dropdown menu with all your custom workflow statuses.
- Tag Categories
Strings associated to tags in a particular category. There are 4 predefined tag categories: iOS, Android, Web, Jira. If your project contains custom categories, they will also be displayed under this filter option.
- Orders
Strings belonging to each completed translation order. In this filter option, you can select any of the completed order numbers to filter strings that belong to it.
- Duplicates
Two or more identical strings in the base or target languages. To view the results of this filter in context, we recommend that the base language is always selected.
- Inconsistencies
Strings that have the same content for the base language, but various translations. To view the results of this filter in context, we recommend that the base language is always selected.
- No Tags
Content that is not assigned to any tag. This also means that there is no screenshot provided.
- With Screenshots
Strings that have an associated screenshot in GL Strings.
- No Screenshots
Strings that do not have an associated screenshot in GL Strings, but might still have a tag.
- Longer Than Base String
The number of characters in the translated string exceeds the number of characters in the base string.
-
With Issues
- Any
Strings that contain any of the below issues.
- Glossary Term Missing
Translations that do not follow the glossary terms.
- Translation Outdated
Published translations that are older than (updated) source.
- Draft Outdated
Draft translations that are older than (updated) source.
- Exceeds Max Length
Strings that exceed a manually set character restriction.
- Validation Failed
Strings or string IDs that contain forbidden characters.
- Variable missing
A variable is present in the source base language string, but not present in the target translation.
Back to top
Custom filters
From the Custom filter tab, users with Manager role or above can
custom filters with one or multiple conditions. These types of filters are stored at a team level. They are shared across all projects for use by any role within the same team.

Back to top
Create a custom filter
📝 Note: Requires Manager role or above
- Click Filter > Custom > New Filter
- Select the criteria from the first dropdown menu
- Choose a condition from the second dropdown menu
- Specify the condition in the third dropdown menu (and so on)
- Click +Add to include additional criteria in the filter
- Click Save and Apply
- Name the new custom filter > click Save and Apply
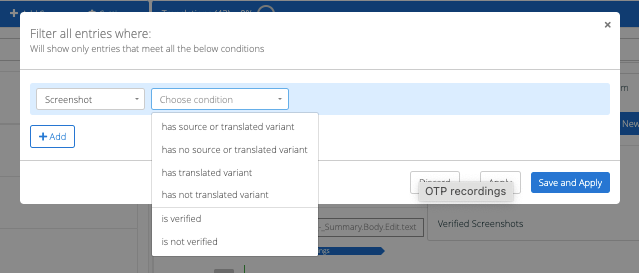
Below you can find all the conditions that can be selected in the custom filter dialog:
- Translation filters strings based on their status: empty/not empty, draft/target, locked/unlocked, strings with issues, strings where the source and translated value are identical, or strings that are set to one or multiple statuses.
- Source filters strings in the base language based on their value: if it's empty/not empty or if the value matches the string ID
- Key Name allows users to add specific string IDs to a filter. The section below contains more information about this filter option
- Key Creation Date filters strings based on their creation date
- Change Date filters strings based on the date they were last updated
- Changed displays strings that were last edited by a specific team member
- Tag displays strings linked/not linked to one or multiple tags
- Metadata filters strings based on their metadata
- Comments allows users to filter strings with comments or without comments
- Key filters strings that are linked or not linked
- Screenshot allows users to filter strings that are linked to a source or translated screenshot, a source or translated variant, and screenshots that are verified or unverified
Back to top
Key Name filter considerations
- The Key Name filter condition can only be used in combination with the Tag filter condition.
- The Key Name filter condition uses the OR logical operator. When used in combination with the Tag filter, the search result will display all the strings linked to the tag AND the string linked to the relevant key name.
- Users can combine multiple key names in one search. Similarly, the search result will show all the strings linked to the given key names.
- Users can add a large number of strings to the Key Name filter option with the help of the Copy Key Name(s) action from the multi-edit actions menu. With this action, users can easily copy the key names from the selected strings all at once. Then, they can paste them into the Key Name filter option to automatically populate it with the relevant key names.
Back to top
Working with custom filters

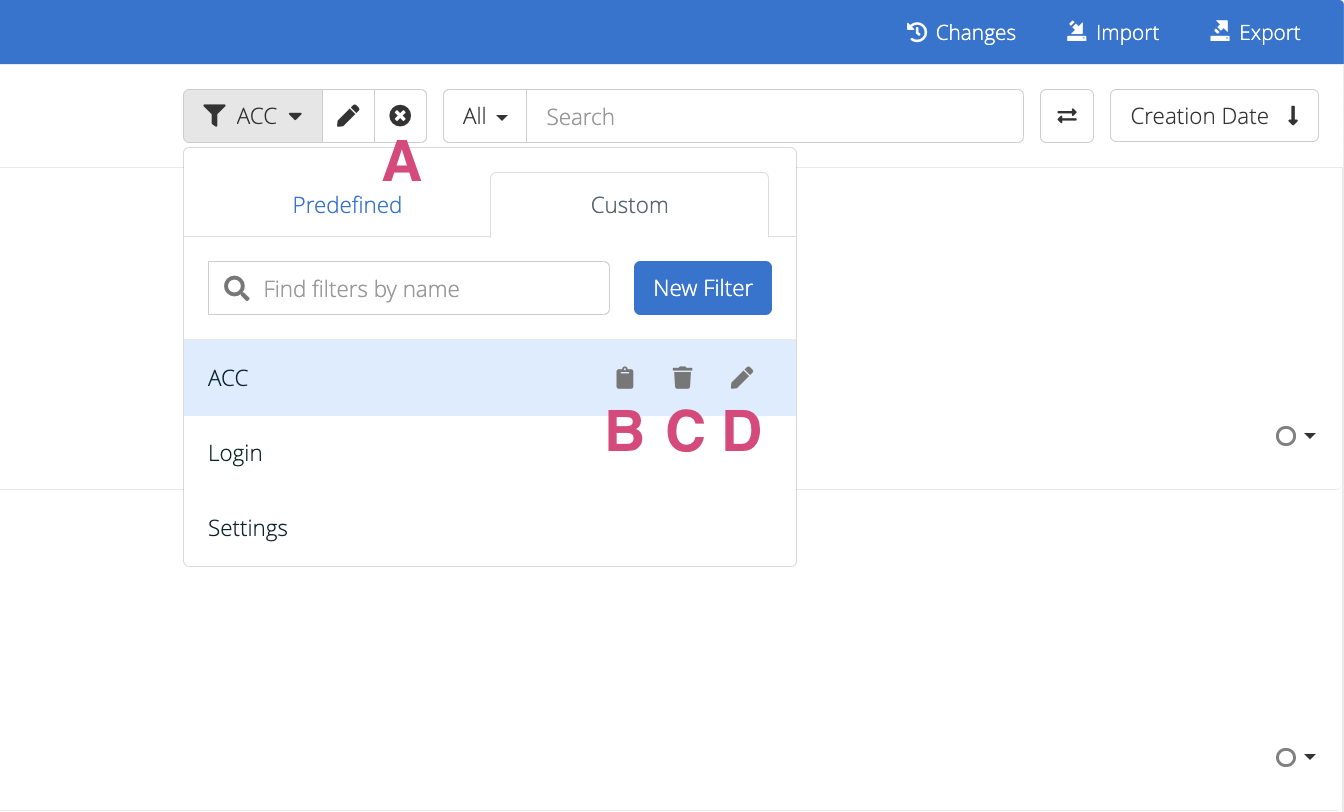
Apply, remove, or link to custom filters
- To apply a filter, simply click on it
- To remove a filter, click on the Clear Filter icon (see screenshot above, pointer A)
- To copy the filter's URL, hover over it and click on the clipboard icon. There is no need to select the filter, simply click on this icon to copy the link to the filtered list of strings (see screenshot above, pointer B)
Delete or edit custom filters
📝 Note: Requires Manager role or above
- To delete a filter, hover over it and click on the bin icon (see screenshot above, pointer C)
- To edit a custom filter, hover over a filter and click on the pencil icon (see screenshot above, pointer D)
Apply AND save custom filters
📝 Note: Requires Manager role or above
- Your applied filter can be saved at any point by clicking on the save icon. You can apply a filter and save it afterwards. It will be temporarily saved until you clear all filters (see screenshot below, pointer A).
- Your applied filter can be edited at any point by clicking on the pencil icon (see screenshot below, pointer B).

Back to top
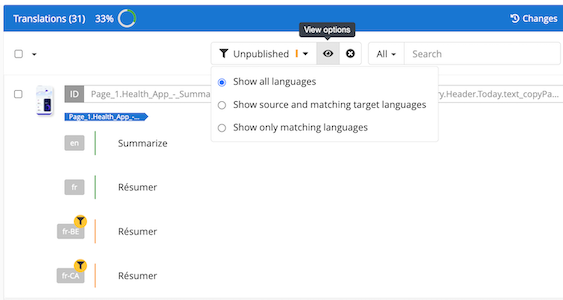
Filtering in multilingual mode
When multilingual mode is enabled in the Editor, there are additional filter options to find only the specific translations associated with a key where the values match the filter criteria.
To enable these additional filter options:
- Apply the filter
- Click the View options eye icon
- Select the multilingual filter criteria
- Show all languages: displays all translations associated with the key, regardless of whether they match the filter criteria (default)
- Show source and matching target languages: displays the source and only those translations associated with the key that match the filter criteria.
- Show only matching languages: displays only those translations associated with the key that contain values matching the filter, hiding all other translations.
Back to top

